Why You’ll Love This Lemon Curd
If you have been searching for a Lemon Curd recipe that is quick, bright, and wonderfully smooth, this one checks every box. It only takes a few pantry staples, comes together in about 10 minutes of cooking time, and turns into a glossy, spoonable treat that feels fancy without being fussy.
- Easy to make: This lemon curd recipe uses a simple double boiler method, so you can cook it gently without burning the eggs. With just 5 minutes of prep and 10 minutes on the stove, it is perfect for busy parents, students, and working professionals who still want a homemade treat.
- Bright and refreshing flavor: Fresh lemon juice, lemon zest, sugar, eggs, and butter create that tangy-sweet balance people love in homemade lemon curd. It tastes sunny, fresh, and just a little bit luxurious.
- Flexible for different needs: This lemon curd with 5 ingredients can be made thicker by swapping 2 egg yolks for 1 whole egg, and it can also be adapted with limes, oranges, grapefruits, pineapple, or cranberry juice for fun flavor twists.
- So many ways to use it: Spread it on scones, swirl it into yogurt, spoon it over pancakes, or use it as filling for cakes, tarts, and cupcakes. It is the kind of recipe that makes everyday snacks feel special.
Fresh lemon juice makes a big difference here. If you want the best flavor, skip bottled juice and go straight for real lemons.
For readers who enjoy learning about the nutrition side of citrus, you can also read more about the health benefits of lemons and why lemons are such a handy kitchen fruit.
Jump to:
- Why You’ll Love This Lemon Curd
- How to Prepare the Perfect Lemon Curd: Step-by-Step Guide
- Ingredients
- First Step: Gather and prep everything
- Second Step: Set up the double boiler
- Third Step: Combine the base ingredients
- Fourth Step: Whisk until thickened
- Fifth Step: Add the butter off the heat
- Final Step: Cool, cover, and chill
- Quick timing guide
- Dietary Substitutions to Customize Your Lemon Curd
- Protein and Main Component Alternatives
- Vegetable, Sauce, and Seasoning Modifications
- Mastering Lemon Curd: Advanced Tips and Variations
- Pro cooking techniques
- Flavor variations
- Presentation tips
- Make-ahead options
- How to Store Lemon Curd: Best Practices
- Refrigeration
- Freezing
- Reheating
- Meal prep considerations
- FAQs: Frequently Asked Questions About Lemon Curd
- What is lemon curd?
- How do you make lemon curd from scratch?
- How long does homemade lemon curd last?
- Can I make lemon curd with other citrus fruits?
- What are common mistakes when making lemon curd?
- Lemon Curd
- Ingredients
- Instructions
- Last Step:
- Notes
- Nutrition
- Did you make this recipe?
How to Prepare the Perfect Lemon Curd: Step-by-Step Guide
Making Lemon Curd at home is easier than most people think. The trick is gentle heat, constant whisking, and a little patience while it cools. Follow these steps and you will end up with a silky, tangy curd that tastes like sunshine in a jar.
Ingredients
- 4 large egg yolks, or for thicker curd, 2 egg yolks plus 1 whole egg
- 2/3 cup granulated sugar
- 1 tablespoon lemon zest, from about 1 lemon
- 1/3 cup fresh lemon juice, from about 2 to 3 lemons
- 1/8 teaspoon salt
- 6 tablespoons unsalted butter, softened and cut into 6 pieces
First Step: Gather and prep everything
Before you start cooking, measure all your lemon curd ingredients and have them ready by the stove. Separate the eggs if needed, zest the lemon, and squeeze fresh juice. Since this recipe moves quickly once the heat is on, a little prep now makes the process smoother later.
If you want to make this recipe even more beginner friendly, line up a whisk, a heatproof bowl or double boiler, and a clean jar for storing the finished curd. This is also a great time to set out a fine mesh strainer if you like your homemade lemon curd extra smooth.
Second Step: Set up the double boiler
Fill the bottom of a double boiler with 1 to 2 inches of water and bring it to a simmer over high heat. Once the water is simmering, reduce the heat to low. The goal is steady steam, not a rolling boil.
If you do not have a double boiler, a heatproof glass bowl set over a saucepan works well too. Just make sure the bowl does not touch the water. Using a non-metal bowl or boiler is smart because it helps prevent a metallic taste in the finished curd.
Third Step: Combine the base ingredients
In the top of the double boiler, whisk together the egg yolks, sugar, lemon zest, lemon juice, and salt. Keep whisking as the mixture warms. This is the part where the magic starts to happen, because the eggs and sugar begin to thicken into a rich custard base.
Be patient here. The mixture should not rush. If the heat is too high, the eggs can scramble. A low, steady temperature gives you that smooth, creamy texture people want in an easy lemon curd recipe.
Fourth Step: Whisk until thickened
Continue whisking constantly for about 10 minutes, or until the mixture reaches a hollandaise-like texture. If you use a thermometer, aim for 170 degrees Fahrenheit. At that point, the curd should coat the back of a spoon and look glossy and slightly thick.
Do not walk away during this step. Constant whisking helps prevent curdling and keeps the texture silky. If you notice the curd thickening unevenly, lower the heat a little and keep stirring. The texture will continue to improve as it cooks.
Fifth Step: Add the butter off the heat
Once the curd has thickened, remove it from the heat. Add the butter pieces and whisk until they melt completely. The butter gives the curd its smooth finish and rich flavor. As the butter blends in, the mixture should turn glossy and even more luscious.
If you want a thicker curd, use the version with 2 egg yolks and 1 whole egg. That small swap gives a firmer set, which is great for tart filling or layered desserts.
Final Step: Cool, cover, and chill
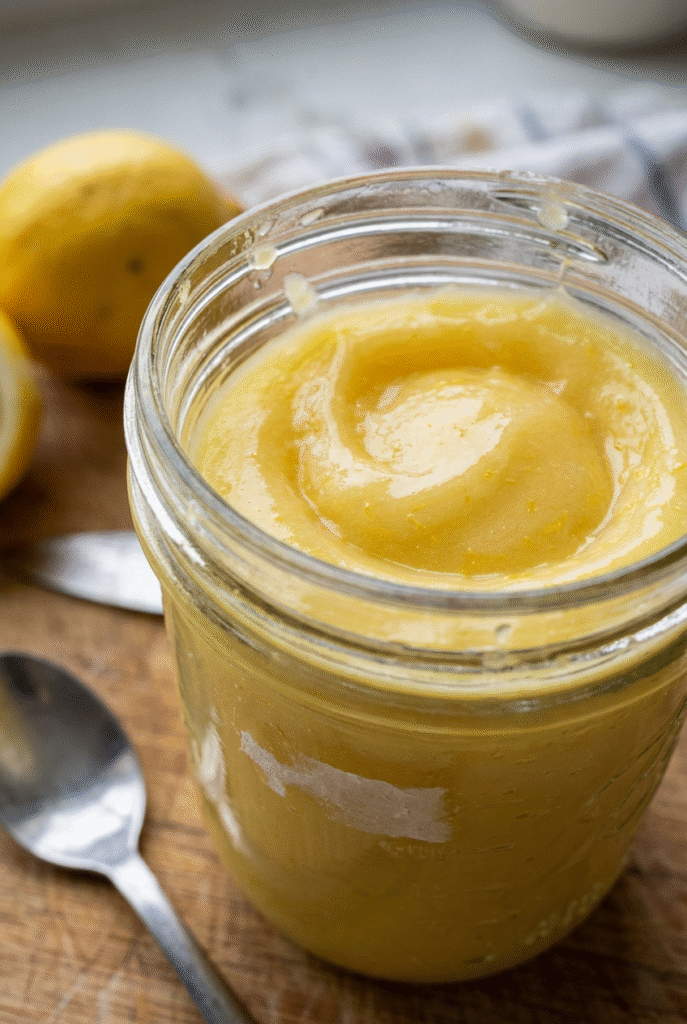
Pour the finished curd into a jar or bowl. Cover it with plastic wrap directly on the surface so a skin does not form. Let it cool, then refrigerate. It will thicken more as it chills, so do not worry if it seems a little loose at first.
The total time is about 1 hour and 15 minutes, including cooling. Once chilled, your Lemon Curd will be ready for spooning, spreading, and baking. Use it within up to 10 days for the best flavor and texture.
Quick timing guide
| Task | Time |
|---|---|
| Prep time | 5 minutes |
| Cook time | 10 minutes |
| Total time | 1 hour 15 minutes |
If the curd looks a little soft while it is warm, that is normal. It firms up more once it cools in the fridge.

Dietary Substitutions to Customize Your Lemon Curd
Protein and Main Component Alternatives
The classic version of homemade lemon curd uses egg yolks, but there are a few easy ways to change the texture. For a thicker curd, replace 2 egg yolks with 1 whole egg. That gives the curd a firmer set, which can be helpful for pies, tarts, and layered cakes.
If you need to avoid eggs for any reason, traditional lemon curd is harder to duplicate exactly, since eggs are what create the custard texture. In that case, look for a plant-based citrus spread recipe made with starch and dairy-free butter. It will taste different, but it can still give you that bright lemon flavor.
Vegetable, Sauce, and Seasoning Modifications
Although lemon is the star, this recipe is easy to adapt with other citrus fruits. Try limes for a sharper tang, oranges for a sweeter finish, grapefruits for a slightly bitter edge, or even pineapple and cranberry for a fun twist. The method stays the same, but the flavor changes in playful ways.
You can also adjust the sugar slightly depending on the fruit. Sweeter citrus may need a little less sugar, while tart fruit may taste best with the full amount. A pinch more salt can help balance the flavor too. For more serving ideas, pair your curd with breakfast breads, fruit parfaits, or recipes from our kitchen recipe collection.
Mastering Lemon Curd: Advanced Tips and Variations
Once you have made lemon curd with 5 ingredients once or twice, you may want to fine-tune it. A few small changes can help you get exactly the texture and flavor you love.
Pro cooking techniques
Use fresh lemon juice instead of bottled juice whenever possible. Fresh juice gives a brighter taste and cleaner aroma. Also, cook the curd in a non-metal double boiler or a heatproof glass bowl to avoid any odd metallic notes.
Keep the whisk moving the whole time. That constant motion helps the eggs cook evenly and keeps the curd smooth. If you are nervous about overcooking, pull it off the heat as soon as it starts to thicken and hits around 170 degrees Fahrenheit.
Flavor variations
You can stir in a little extra zest if you want a stronger lemon punch, or use different citrus zest for a mixed-citrus version. Lime curd is especially nice for pies, while orange curd tastes lovely in pastries and sandwich cookies. Cranberry and pineapple versions can be a fun seasonal surprise for holidays and brunches.
Presentation tips
Spoon the curd into a clean jar, then top it with a label or ribbon if you are gifting it. For serving, try it on warm scones, fluffy muffins, pancakes, or toast. It also makes a beautiful filling for cupcakes and layer cakes.
Make-ahead options
This recipe works well for planning ahead. Make it a day or two before a brunch, birthday party, or holiday gathering, then chill it until you are ready to serve. The curd thickens more as it cools, so make-ahead prep actually helps the texture.
For party hosts, a batch of homemade lemon curd can turn plain desserts into something people talk about long after the plates are cleared.
How to Store Lemon Curd: Best Practices
Storing Lemon Curd the right way keeps it fresh, creamy, and safe to eat. Since it contains eggs and butter, it needs to stay chilled.
Refrigeration
After the curd cools, place it in an airtight jar or bowl and refrigerate it right away. It will keep for up to 10 days, and in many home kitchens it stays lovely for about 1 to 2 weeks if handled well. Always keep it below 40 degrees Fahrenheit.
Freezing
If you want to save it longer, freeze the curd in small portions for up to 3 months. Leave a little room in the container for expansion. Thaw it overnight in the fridge, then stir it gently before using.
Reheating
Most of the time, you will not need to reheat lemon curd. If it has been frozen and seems too firm, let it thaw slowly in the refrigerator instead of warming it quickly. Fast heat can affect the texture.
Meal prep considerations
Batch cooking is a smart move if you like planning breakfast or desserts ahead of time. Make one batch, divide it into smaller jars, and keep one in the fridge while freezing the rest. That way, you always have a sweet citrus spread ready to go.

FAQs: Frequently Asked Questions About Lemon Curd
What is lemon curd?
How do you make lemon curd from scratch?
How long does homemade lemon curd last?
Can I make lemon curd with other citrus fruits?
What are common mistakes when making lemon curd?

Lemon Curd
🍋 Silky-smooth, zesty lemon curd bursts with fresh citrus tang – versatile spread elevates scones, tarts, cakes effortlessly!
🧈 5-ingredient stovetop wonder ready in 15 minutes + chill – homemade luxury beats store-bought every time!
- Total Time: 1 hour 15 minutes
- Yield: 1 1/2 cups (12 servings)
Ingredients
Instructions
1-First Step: Gather and prep everything Before you start cooking, measure all your lemon curd ingredients and have them ready by the stove. Separate the eggs if needed, zest the lemon, and squeeze fresh juice. Since this recipe moves quickly once the heat is on, a little prep now makes the process smoother later. If you want to make this recipe even more beginner friendly, line up a whisk, a heatproof bowl or double boiler, and a clean jar for storing the finished curd. This is also a great time to set out a fine mesh strainer if you like your homemade lemon curd extra smooth.
2-Second Step: Set up the double boiler Fill the bottom of a double boiler with 1 to 2 inches of water and bring it to a simmer over high heat. Once the water is simmering, reduce the heat to low. The goal is steady steam, not a rolling boil. If you do not have a double boiler, a heatproof glass bowl set over a saucepan works well too. Just make sure the bowl does not touch the water. Using a non-metal bowl or boiler is smart because it helps prevent a metallic taste in the finished curd.
3-Third Step: Combine the base ingredients In the top of the double boiler, whisk together the egg yolks, sugar, lemon zest, lemon juice, and salt. Keep whisking as the mixture warms. This is the part where the magic starts to happen, because the eggs and sugar begin to thicken into a rich custard base. Be patient here. The mixture should not rush. If the heat is too high, the eggs can scramble. A low, steady temperature gives you that smooth, creamy texture people want in an easy lemon curd recipe.
4-Fourth Step: Whisk until thickened Continue whisking constantly for about 10 minutes, or until the mixture reaches a hollandaise-like texture. If you use a thermometer, aim for 170 degrees Fahrenheit. At that point, the curd should coat the back of a spoon and look glossy and slightly thick. Do not walk away during this step. Constant whisking helps prevent curdling and keeps the texture silky. If you notice the curd thickening unevenly, lower the heat a little and keep stirring. The texture will continue to improve as it cooks.
5-Fifth Step: Add the butter off the heat Once the curd has thickened, remove it from the heat. Add the butter pieces and whisk until they melt completely. The butter gives the curd its smooth finish and rich flavor. As the butter blends in, the mixture should turn glossy and even more luscious. If you want a thicker curd, use the version with 2 egg yolks and 1 whole egg. That small swap gives a firmer set, which is great for tart filling or layered desserts.
6-Final Step: Cool, cover, and chill Pour the finished curd into a jar or bowl. Cover it with plastic wrap directly on the surface so a skin does not form. Let it cool, then refrigerate. It will thicken more as it chills, so do not worry if it seems a little loose at first. The total time is about 1 hour and 15 minutes, including cooling. Once chilled, your Lemon Curd will be ready for spooning, spreading, and baking. Use it within up to 10 days for the best flavor and texture.
Last Step:
Please leave a rating and comment letting us know how you liked this recipe! This helps our business to thrive and continue providing free, high-quality recipes for you.Notes
🍋 Always use fresh lemons for vibrant flavor – bottled juice lacks punch.
🔥 Whisk nonstop over gentle simmer to avoid curdling or scrambling.
❄️ Thickens further when chilled; perfect for fillings, toppings anytime.
- Prep Time: 5 minutes
- Cool: 1 hour
- Cook Time: 10 minutes
- Category: Sauces
- Method: Double Boiler
- Cuisine: British
- Diet: Vegetarian, Gluten-Free
Nutrition
- Serving Size: 2 tablespoons
- Calories: 110 kcal
- Sugar: 10g
- Sodium: 40mg
- Fat: 7g
- Saturated Fat: 4g
- Unsaturated Fat: 2.5g
- Trans Fat: 0g
- Carbohydrates: 10g
- Fiber: 0g
- Protein: 1g
- Cholesterol: 75mg


