Why You’ll Love This Fried Milk
Fried milk offers a simple way to enjoy a crispy treat that mixes sweet creaminess with a golden crunch, making it perfect for home cooks looking for something fun and easy. This recipe stands out because it’s quick to fry once prepared and uses basic ingredients you likely have on hand. Let’s dive into the key reasons this dish is a hit for everyone from busy parents to food enthusiasts.
- Ease of preparation: This fried milk recipe is straightforward and takes just about 20 minutes of active cooking time after chilling, which means you can whip it up without spending hours in the kitchen. The steps involve simple whisking and frying, ideal for beginners or those with tight schedules like students and working professionals. This makes fried milk a go-to option for turning everyday moments into delightful experiences.
- Health benefits: Packed with nutrients from milk, this dessert provides a good dose of calcium and protein, supporting bone health and energy needs for seniors and active families. Each serving has around 461 calories with balanced fats and a low sugar content of 13g, appealing to diet-conscious individuals who want a treat without overindulging. Explore how milk contributes to wellness by checking out this resource on milk benefits for added insight.
- Versatility: Fried milk adapts easily to different tastes and dietary needs, whether you’re making it gluten-free or vegan for family gatherings. It’s flexible for party hosts or travelers seeking portable snacks, and you can pair it with various drinks like iced teas from our site. This adaptability ensures fried milk fits into many lifestyles, from quick meals for newlyweds to fun desserts for baking enthusiasts.
- Distinctive flavor: The combination of a creamy center and crispy outside creates a unique taste that’s both comforting and exciting, setting this fried milk apart from other desserts. Infused with vanilla and a touch of sweetness, it offers a delightful contrast that food enthusiasts will love experimenting with. This special texture and flavor make it a standout choice for enhancing everyday routines.
Jump to:
- Why You’ll Love This Fried Milk
- Essential Ingredients for Fried Milk
- Main Ingredients
- Special Dietary Options
- How to Prepare the Perfect Fried Milk: Step-by-Step Guide
- First Step: Prepare the Milk Mixture
- Second Step: Cook the Mixture
- Third Step: Chill the Mixture
- Fourth Step: Cut the Chilled Mixture
- Fifth Step: Mix the Batter
- Sixth Step: Heat the Oil
- Final Step: Fry and Serve
- Dietary Substitutions to Customize Your Fried Milk
- Protein and Main Component Alternatives
- Vegetable, Sauce, and Seasoning Modifications
- Mastering Fried Milk: Advanced Tips and Variations
- Pro Cooking Techniques
- Flavor Variations
- Presentation Tips
- Make-Ahead Options
- How to Store Fried Milk: Best Practices
- FAQs: Frequently Asked Questions About Fried Milk
- What is fried milk dessert?
- How do you make the milk mixture for fried milk?
- What batter works best for fried milk?
- What temperature should oil be for frying milk?
- How do you keep fried milk mixture from getting watery?
- Fried Milk
- Ingredients
- Instructions
- Last Step:
- Notes
- Nutrition
- Did you make this recipe?
Essential Ingredients for Fried Milk
To make this fried milk recipe, you’ll need a few key items that blend together for a creamy base and crispy finish. Each ingredient plays a role in creating that perfect balance of textures and flavors. Below is a comprehensive list with precise measurements and explanations to help you prepare it smoothly.
Main Ingredients
- 2 cups milk – Provides the rich, creamy base that forms the custard-like center, offering essential calcium and protein for a nutritious twist.
- ½ cup corn starch – Acts as a thickener for the milk mixture, ensuring it sets firmly when chilled and helps create the soft interior texture.
- 2 tablespoons condensed milk – Adds a sweet, velvety richness that enhances the overall flavor without needing extra sugar.
- ½ tablespoon sugar – Balances the sweetness and helps the mixture caramelize slightly during frying for a better taste.
- 1 teaspoon vanilla extract – Infuses a warm, aromatic flavor that makes the fried milk more appealing and comforting.
- 2 tablespoons corn starch (for batter) – Contributes to a light, crispy coating that fries up golden and holds the shape well.
- 2 tablespoons rice flour or all-purpose flour (for batter) – Gives the batter structure, with rice flour providing a lighter option as an alternative.
- 1 teaspoon baking powder (for batter) – Helps the batter puff up slightly for extra crispiness during frying.
- Pinch of salt (for batter) – Enhances the flavors and balances the sweetness in the overall dish.
- ½ cup ice cold water (for batter) – Keeps the batter thin and cold, ensuring a quick fry and preventing sogginess.
- 1 teaspoon oil (for batter) – Adds a bit of moisture to the batter for even coating and better adhesion to the milk pieces.
- 2 cups corn oil (for frying) – Serves as the frying medium, heating to the ideal temperature for a golden, non-greasy result.
- Powdered sugar (for garnish) – Dusted on top for a sweet finish that complements the creamy center.
Special Dietary Options
- Vegan: Swap the milk for 2 cups of almond or oat milk and use a plant-based condensed milk to keep the creamy texture while making it dairy-free.
- Gluten-free: Stick with rice flour in the batter instead of all-purpose flour to ensure the recipe remains gluten-free without altering the crispiness.
- Low-calorie: Reduce the sugar to just a pinch and use low-fat milk to lower the calorie count per serving while maintaining the dish’s appeal.
How to Prepare the Perfect Fried Milk: Step-by-Step Guide
Creating fried milk at home is a rewarding process that results in a crispy, creamy delight. This guide walks you through each step using the exact ingredients and methods provided. With a total preparation time of about 4 hours and 35 minutes, including chilling, it’s perfect for planning ahead. For more dessert inspiration, visit our delicious desserts page on the blog.
First Step: Prepare the Milk Mixture
Start by gathering your ingredients and tools, like a stainless steel pot for even heating. In a pot, whisk together ½ cup corn starch, 2 cups milk, 2 tablespoons condensed milk, ½ tablespoon sugar, and 1 teaspoon vanilla extract until well combined.
Second Step: Cook the Mixture
Cook the mixture over medium heat, stirring continuously for 5-6 minutes until it thickens. Stir occasionally to prevent sticking, and once it’s pudding-like, remove from heat. This step ensures a firm base that holds up during frying and adapts well to dietary needs by using gluten-free options if required.
Third Step: Chill the Mixture
Line a 6×6 or 8×8-inch container with parchment paper, pour in the thickened mixture, and spread it evenly. Cover with another sheet of parchment paper and refrigerate for at least 4 hours or overnight. This chilling process is key for a non-watery custard, making it easier to handles for busy parents or students.
Fourth Step: Cut the Chilled Mixture
Once chilled, unmold the mixture onto a cutting board and cut it into pieces that are 2 inches long by 1 inch wide. This size ensures even frying and a great bite ratio, allowing for customizations based on preferences like smaller pieces for kids.
Fifth Step: Mix the Batter
In a bowl, mix 2 tablespoons corn starch, 2 tablespoons rice flour or all-purpose flour, 1 teaspoon baking powder, a pinch of salt, ½ cup ice cold water, and 1 teaspoon oil until smooth. This batter creates a light coating that fries crispy, and you can make it gluten-free by choosing rice flour.
Sixth Step: Heat the Oil
Heat 2 cups corn oil in a deep pot to 350°F, using a thermometer for accuracy. Frying at this temperature ensures the pieces turn golden brown in 2-3 minutes without absorbing too much oil, which is great for diet-conscious folks.
Final Step: Fry and Serve
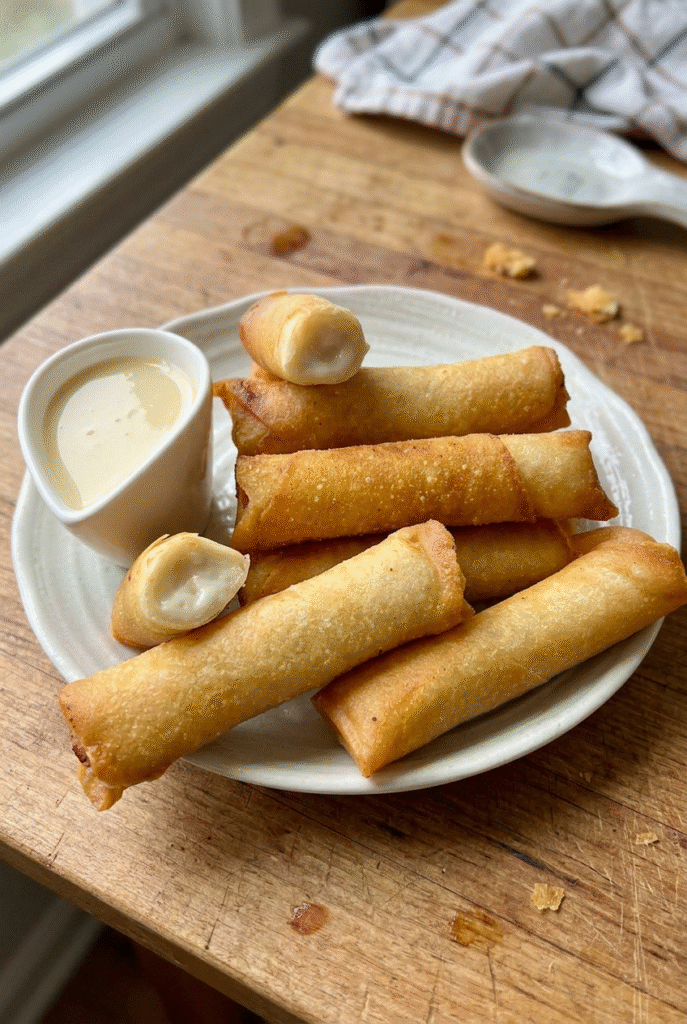
Dip the milk pieces in the batter, then gently lower them into the hot oil to fry for 2-3 minutes until golden. Drain on paper towels or a wire rack, let cool slightly, and dust with powdered sugar before serving. This fried milk pairs wonderfully with beverages, enhancing your home mixology adventures as described on the blog.
| Nutrient | Amount per Serving |
|---|---|
| Calories | 461 kcal |
| Carbohydrates | 34 g |
| Protein | 5 g |
| Fat | 34 g |

Dietary Substitutions to Customize Your Fried Milk
Protein and Main Component Alternatives
If you want to tweak the main ingredients, try swapping milk for nut-based options like almond milk to keep it creamy for vegan diets. For a lower-calorie version, use skim milk instead of whole milk, which reduces fat while maintaining the structure. These changes help adapt fried milk for various needs without losing its appeal.
Vegetable, Sauce, and Seasoning Modifications
While fried milk doesn’t include vegetables, you can add a twist with seasonings like cinnamon in the batter for extra flavor. For sauces, pair it with a light fruit dip instead of powdered sugar to suit low-sugar preferences. These modifications make the recipe versatile for seasons or dietary restrictions.
Mastering Fried Milk: Advanced Tips and Variations
Pro Cooking Techniques
Use a stainless steel pot for even heating to avoid scorching the mixture, and cover it tightly with parchment before chilling for a firm result. For crispier texture, coat pieces in flour, egg, and panko before the batter, which enhances the fry without much extra effort.
Flavor Variations
Experiment with different extracts like almond for a nutty twist, or add cocoa to the milk mixture for a chocolate version that appeals to baking enthusiasts.
Presentation Tips
Dust with powdered sugar creatively or serve with fresh fruits for an eye-catching plate that impresses at gatherings.
Make-Ahead Options
Prepare the mixture in advance and store it in the fridge, making it easy for busy schedules to enjoy fresh-fried treats anytime. Discover more storage ideas in the next section.
This treat combines simplicity with surprise, perfect for turning ordinary days into special ones.
How to Store Fried Milk: Best Practices
Proper storage keeps your fried milk tasty and safe. For short-term needs, follow these guidelines to maintain its crispiness.
- Refrigeration: Store leftovers in an airtight container in the fridge for up to 2 days to keep the texture firm.
- Freezing: Freeze the chilled mixture before frying; wrap pieces individually and store for up to a month, thawing in the fridge first.
- Reheating: Reheat in a 350°F oven for a few minutes to regain crispiness without making it soggy.
- Meal Prep Considerations: Batch cook the mixture ahead for quick frying later, ideal for working professionals.

FAQs: Frequently Asked Questions About Fried Milk
What is fried milk dessert?
How do you make the milk mixture for fried milk?
What batter works best for fried milk?
What temperature should oil be for frying milk?
How do you keep fried milk mixture from getting watery?

Fried Milk
🥛 Dive into the unique crispy exterior and gooey creamy center of Deep Fried Milk, a delightful treat that’s surprisingly light and offers a fun twist on classic desserts with calcium-rich milk benefits.
🍮 Treat yourself to this indulgent Chinese-inspired snack that’s quick to fry up after chilling, perfect for parties or sweet cravings, combining textures for an unforgettable homemade delight.
- Total Time: 4 hours 30 minutes
- Yield: 4 servings
Ingredients
– 2 cups milk
– ½ cup corn starch
– 2 tablespoons condensed milk
– ½ tablespoon sugar
– 1 teaspoon vanilla extract
– 2 tablespoons corn starch for batter
– 2 tablespoons rice flour or all-purpose flour for batter
– 1 teaspoon baking powder for batter
– Pinch of salt for batter
– ½ cup ice cold water for batter
– 1 teaspoon oil for batter
– 2 cups corn oil for frying
– Powdered sugar for garnish
Instructions
1-First Step: Prepare the Milk Mixture Start by gathering your ingredients and tools, like a stainless steel pot for even heating. In a pot, whisk together ½ cup corn starch, 2 cups milk, 2 tablespoons condensed milk, ½ tablespoon sugar, and 1 teaspoon vanilla extract until well combined.
2-Second Step: Cook the Mixture Cook the mixture over medium heat, stirring continuously for 5-6 minutes until it thickens. Stir occasionally to prevent sticking, and once it’s pudding-like, remove from heat. This step ensures a firm base that holds up during frying and adapts well to dietary needs by using gluten-free options if required.
3-Third Step: Chill the Mixture Line a 6×6 or 8×8-inch container with parchment paper, pour in the thickened mixture, and spread it evenly. Cover with another sheet of parchment paper and refrigerate for at least 4 hours or overnight. This chilling process is key for a non-watery custard, making it easier to handles for busy parents or students.
4-Fourth Step: Cut the Chilled Mixture Once chilled, unmold the mixture onto a cutting board and cut it into pieces that are 2 inches long by 1 inch wide. This size ensures even frying and a great bite ratio, allowing for customizations based on preferences like smaller pieces for kids.
5-Fifth Step: Mix the Batter In a bowl, mix 2 tablespoons corn starch, 2 tablespoons rice flour or all-purpose flour, 1 teaspoon baking powder, a pinch of salt, ½ cup ice cold water, and 1 teaspoon oil until smooth. This batter creates a light coating that fries crispy, and you can make it gluten-free by choosing rice flour.
6-Sixth Step: Heat the Oil Heat 2 cups corn oil in a deep pot to 350°F, using a thermometer for accuracy. Frying at this temperature ensures the pieces turn golden brown in 2-3 minutes without absorbing too much oil, which is great for diet-conscious folks.
7-Final Step: Fry and Serve Dip the milk pieces in the batter, then gently lower them into the hot oil to fry for 2-3 minutes until golden. Drain on paper towels or a wire rack, let cool slightly, and dust with powdered sugar before serving. This fried milk pairs wonderfully with beverages, enhancing your home mixology adventures as described on the blog.
Last Step:
Please leave a rating and comment letting us know how you liked this recipe! This helps our business to thrive and continue providing free, high-quality recipes for you.Notes
🍲 Use a stainless steel pot for even heating and to prevent the milk mixture from sticking or scorching during cooking.
🧊 Cover the chilled milk tightly with parchment paper before refrigerating to avoid condensation and maintain a smooth texture.
🥚 For extra crispiness, double-coat by dusting pieces with flour, dipping in beaten egg, then batter before frying.
- Prep Time: 20 minutes
- Chilling Time: 4 hours
- Cook Time: 10 minutes
- Category: Dessert
- Method: Deep Frying
- Cuisine: Chinese
- Diet: Vegetarian
Nutrition
- Serving Size: 4 pieces
- Calories: 461 kcal
- Sugar: 13g
- Sodium: 167mg
- Fat: 34g
- Saturated Fat: 5g
- Unsaturated Fat: 27g
- Trans Fat: 0.1g
- Carbohydrates: 34g
- Fiber: 0.3g
- Protein: 5g
- Cholesterol: 18mg


