Why You’ll Love This Durian Mochi
Hey there, friends! If you’re a fan of fun, easy desserts that pack a punch of flavor, durian mochi is about to become your new favorite treat. This homemade version combines the chewy goodness of mochi with a creamy durian filling, making it a simple yet delightful option for any occasion. Let’s break down why this recipe stands out and why you’ll want to make it again and again.
- Ease of preparation: One of the best things about durian mochi is how quickly it comes together with just a microwave, no oven needed. With total prep and cook time around 35 minutes, even busy parents or students can whip up a batch without stress. This makes it perfect for spontaneous snacks or last-minute gatherings, letting you enjoy fresh treats without hours in the kitchen.
- Health benefits: Durian mochi offers a mix of carbs from glutinous rice flour for energy, along with natural fats and vitamins from the fresh durian fruit. It’s a fun way for diet-conscious folks to indulge while getting some nutrients, though it’s high in sugars so enjoy in moderation. Plus, using whole milk and fresh ingredients keeps it feeling wholesome compared to store-bought options.
- Versatility: This recipe adapts easily to different needs, like making it vegan with plant-based milk or adjusting for gluten-free diets since the base is naturally gluten-free. Whether you’re a food enthusiast experimenting with flavors or a working professional prepping ahead, durian mochi fits various lifestyles and can be customized for events or dietary preferences.
- Distinctive flavor: The bold, creamy taste of durian paired with the soft, chewy texture of mochi creates a one-of-a-kind experience that’s hard to resist. It’s like a tropical adventure in every bite, appealing to travelers or newlyweds looking for something exotic yet comforting. This contrast makes durian mochi a standout dessert that elevates simple ingredients into something memorable.
As you can see, durian mochi isn’t just tasty it’s practical and adaptable for all kinds of people, from baking enthusiasts to party hosts. By incorporating fresh durian and straightforward steps, you’ll create a dessert that delights the senses and fits right into your routine. Give it a try, and you’ll see why it’s such a hit!
Jump to:
- Why You’ll Love This Durian Mochi
- Essential Ingredients for Durian Mochi
- Main Ingredients
- Special Dietary Options
- How to Prepare the Perfect Durian Mochi: Step-by-Step Guide
- First Step: Prepare the Durian Filling
- Second Step: Mix the Mochi Dough
- Third Step: Cook the Dough
- Fourth Step: Cool and Knead the Dough
- Fifth Step: Assemble the Mochi
- Final Step: Finish and Serve
- Dietary Substitutions to Customize Your Durian Mochi
- Protein and Main Component Alternatives
- Vegetable, Sauce, and Seasoning Modifications
- Mastering Durian Mochi: Advanced Tips and Variations
- How to Store Durian Mochi: Best Practices
- FAQs: Frequently Asked Questions About Durian Mochi
- What is durian mochi?
- Where can I buy durian to make durian mochi?
- Can I use frozen durian for durian mochi filling?
- How do I store homemade durian mochi?
- How do I prevent mochi dough from sticking when making durian mochi?
- Durian Mochi
- Ingredients
- Instructions
- Last Step:
- Notes
- Nutrition
- Did you make this recipe?
Essential Ingredients for Durian Mochi
When it comes to making durian mochi, having the right ingredients on hand is key to getting that perfect chewy texture and creamy fill. This recipe yields 8 pieces and focuses on simple, accessible items that deliver big on flavor. Below, I’ve listed everything you need, with precise measurements and a quick explanation of each one’s role to help you understand why it matters.
Main Ingredients
- 200g glutinous rice flour (1 ½ cups) – This forms the base of the mochi dough, giving it that signature stretchy, chewy texture that makes the dessert so enjoyable.
- 65g granulated sugar (⅓ cup) – Sweetens the dough perfectly, balancing the natural flavors and helping to create a smooth, cohesive mixture when microwaved.
- 40g cornstarch (⅓ cup) for dusting and mixing – Acts as a thickener in the dough and prevents sticking, ensuring your mochi handles easily without falling apart.
- 360ml whole milk (1 ½ cups) – Provides moisture and creaminess to the dough, making it easy to cook in the microwave for a soft, pliable result.
- 1 ½ tablespoons vegetable oil – Added during kneading, this keeps the dough from drying out and gives it a silky finish that enhances the overall mouthfeel.
- A few drops of green food coloring (optional) – Adds a fun visual touch if you want to make your mochi look vibrant, though it’s not essential for taste.
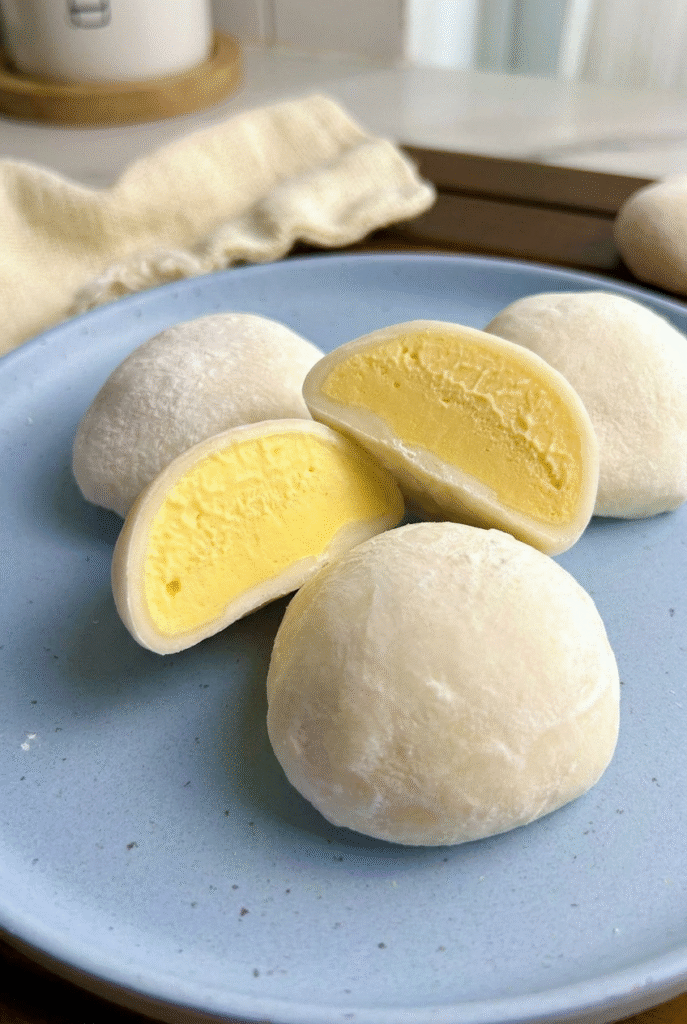
- 200g fresh durian flesh (about 1 cup), seeds removed – The star of the filling, offering a rich, creamy flavor that contrasts beautifully with the chewy exterior.
- 250ml thickened cream (1 cup) – Blends with the durian to create a smooth, luxurious filling that holds its shape when frozen.
- 30g granulated sugar (2 ½ tablespoons) – Sweetens the durian filling just enough to highlight its natural taste without overpowering it.
- Cornstarch or potato starch – Used for dusting to keep everything from sticking during assembly, ensuring your mochi comes out neat and professional.
Special Dietary Options
- Vegan: Swap whole milk for a plant-based alternative like almond or oat milk, and use coconut cream instead of thickened cream to keep the filling dairy-free while maintaining creaminess.
- Gluten-free: This recipe is naturally gluten-free thanks to the glutinous rice flour, but double-check your cornstarch brand to ensure no cross-contamination.
- Low-calorie: Reduce sugar quantities slightly or use a low-calorie sweetener, and opt for low-fat milk to cut down on fats without losing the chewy texture.
By using these ingredients as listed, you’ll have everything needed for a successful batch of durian mochi. For more ideas on adapting recipes, check out our easy mochi recipe on the blog.
How to Prepare the Perfect Durian Mochi: Step-by-Step Guide
Ready to dive into making your own durian mochi? This no-bake recipe is straightforward and fun, perfect for home cooks of all levels. We’ll use the microwave for quick cooking, and I’ll walk you through each step with clear instructions, including tips for timing and adaptations. By the end, you’ll have 8 delicious pieces ready to enjoy.
First Step: Prepare the Durian Filling
Start by blending 200g fresh durian flesh, 250ml thickened cream, and 30g granulated sugar until you get a smooth mixture. For the best results, use a blender or food processor to ensure there are no lumps, which helps the filling hold its shape. Divide the mixture into 8 equal portions, wrap each in cling wrap, and freeze for 30 minutes to firm up this makes it easier to handle later.
Second Step: Mix the Mochi Dough
In a microwave-safe bowl, whisk together 200g glutinous rice flour, 65g granulated sugar, and 40g cornstarch until well combined. Gradually add 360ml whole milk and a few drops of green food coloring if you’re using it, stirring constantly to avoid any lumps and create a uniform batter. This step ensures the dough cooks evenly and achieves that perfect semi-translucent look.
Third Step: Cook the Dough
Cover the bowl and microwave on high for 2 minutes, then carefully remove and stir the mixture thoroughly. Microwave again for another 2 minutes, and continue in 1-minute intervals if needed, checking each time until the dough thickens and turns semi-translucent this usually takes about 5 minutes total. Be cautious as it will be hot, and this step is key for getting the chewy texture without overcooking.
Fourth Step: Cool and Knead the Dough
Let the dough cool for 10-15 minutes until it’s safe to handle, then add 1 ½ tablespoons of vegetable oil and knead it until smooth and elastic. Divide the dough into 8 equal portions, which makes assembly easier and ensures each piece is uniform. If you’re adapting for dietary needs, like using plant-based milk, mix it in here for a seamless swap.
Fifth Step: Assemble the Mochi
Dust your hands and work surface generously with cornstarch or potato starch to prevent sticking. Flatten each dough portion into a circle, place one frozen durian filling ball in the center, and carefully wrap the dough around it, pinching the edges tightly to seal. For variations, like dietary adjustments, press the dough a bit thinner if you want a lighter version without altering the core recipe.
Final Step: Finish and Serve
Roll each assembled mochi in a bit more starch to keep it from sticking, then freeze the pieces for 15-20 minutes before serving to set the shape and enhance the texture. This quick chill makes them easy to handle and improves the eating experience. Serve straight from the freezer or let them sit at room temperature for 5-10 minutes pair with a refreshing drink for a full treat. For more fruit-based ideas, explore our durian smoothies guide on the site.
| Step | Tips for Adaptation |
|---|---|
| Prepare Filling | Use frozen durian if fresh isn’t available, thawing first for a smooth blend. |
| Cook Dough | Adjust microwave time based on your appliance to avoid overcooking for softer results. |

Dietary Substitutions to Customize Your Durian Mochi
Protein and Main Component Alternatives
If you need to tweak the main ingredients for dietary reasons, there are simple swaps to keep things tasty. For instance, replace whole milk with almond milk for a lighter, nuttier flavor that works well in the dough. You can also substitute fresh durian with canned or frozen pulp if it’s easier to find, ensuring the filling stays creamy without changing the recipe’s essence.
Vegetable, Sauce, and Seasoning Modifications
For added variety, experiment with sauces like swapping thickened cream for coconut cream to introduce a tropical twist that complements the durian. Seasonings can include a dash of lime juice in the filling for a zesty kick, or use different food colorings for visual fun. These changes help tailor the mochi to seasonal ingredients or preferences, like making it spicier for food enthusiasts.
Mastering Durian Mochi: Advanced Tips and Variations
Once you’re comfortable with the basics, level up your durian mochi game with these expert pointers. Sift the glutinous rice flour first for an extra-smooth dough that kneads like a dream, and always stir liquids carefully to banish lumps. For flavor variations, mix in coconut extract to the filling for a Southeast Asian vibe, or add lime juice to balance the durian’s richness.
- Pro cooking techniques: Use a silicone spatula for handling sticky dough, and freeze the filling just until firm for easy wrapping without leaks.
- Flavor variations: Try sweetened condensed milk in the filling for a milder taste, or incorporate roasted glutinous rice flour for dusting to add subtle nuttiness.
- Presentation tips: Serve on a simple platter with fresh fruits for a party-ready look, and chill briefly for that perfect chewy bite.
- Make-ahead options: Prep the dough and filling ahead, then assemble when needed to save time for busy schedules.
How to Store Durian Mochi: Best Practices
Proper storage keeps your durian mochi fresh and tasty, whether you’re saving some for later or meal prepping. Keep it in an airtight container to lock in flavors and prevent drying out. For short-term needs, refrigerate the mochi, but remember it holds up best in the freezer for longer periods.
- Refrigerate for up to 3 days by wrapping pieces individually.
- Freeze for up to 2 months using parchment paper to separate layers.
- Reheat by thawing at room temperature for a few minutes.
- Meal prep by making a bigger batch and storing in portions.
Remember, fresh ingredients like durian mean quick storage is key to maintaining that wonderful texture and flavor.

FAQs: Frequently Asked Questions About Durian Mochi
What is durian mochi?
Where can I buy durian to make durian mochi?
Can I use frozen durian for durian mochi filling?
How do I store homemade durian mochi?
How do I prevent mochi dough from sticking when making durian mochi?

Durian Mochi
🥟 Indulge in this homemade durian mochi for its chewy glutinous rice exterior providing sustained energy carbs, stuffed with creamy durian rich in potassium and fiber for a gut-friendly tropical boost.
🍈 This stuffed delight offers a unique contrast of textures and bold flavors, perfect for adventurous eaters seeking an easy, no-bake Asian dessert that’s freezer-stable and shareable for gatherings.
- Total Time: 1 hour 20 minutes
- Yield: 8 pieces
Ingredients
– 200g glutinous rice flour (1 ½ cups) for mochi dough base
– 65g granulated sugar (⅓ cup) for sweetening the dough
– 40g cornstarch (⅓ cup) for dusting and mixing
– 360ml whole milk (1 ½ cups) for dough moisture
– 1 ½ tablespoons vegetable oil for kneading
– A few drops of green food coloring (optional) for coloring
– 200g fresh durian flesh (about 1 cup), seeds removed for filling
– 250ml thickened cream (1 cup) for durian filling
– 30g granulated sugar (2 ½ tablespoons) for sweetening durian filling
– Cornstarch or potato starch for dusting
Instructions
1-First Step: Prepare the Durian Filling Start by blending 200g fresh durian flesh, 250ml thickened cream, and 30g granulated sugar until you get a smooth mixture. For the best results, use a blender or food processor to ensure there are no lumps, which helps the filling hold its shape. Divide the mixture into 8 equal portions, wrap each in cling wrap, and freeze for 30 minutes to firm up this makes it easier to handle later.
2-Second Step: Mix the Mochi Dough In a microwave-safe bowl, whisk together 200g glutinous rice flour, 65g granulated sugar, and 40g cornstarch until well combined. Gradually add 360ml whole milk and a few drops of green food coloring if you’re using it, stirring constantly to avoid any lumps and create a uniform batter. This step ensures the dough cooks evenly and achieves that perfect semi-translucent look.
3-Third Step: Cook the Dough Cover the bowl and microwave on high for 2 minutes, then carefully remove and stir the mixture thoroughly. Microwave again for another 2 minutes, and continue in 1-minute intervals if needed, checking each time until the dough thickens and turns semi-translucent this usually takes about 5 minutes total. Be cautious as it will be hot, and this step is key for getting the chewy texture without overcooking.
4-Fourth Step: Cool and Knead the Dough Let the dough cool for 10-15 minutes until it’s safe to handle, then add 1 ½ tablespoons of vegetable oil and knead it until smooth and elastic. Divide the dough into 8 equal portions, which makes assembly easier and ensures each piece is uniform. If you’re adapting for dietary needs, like using plant-based milk, mix it in here for a seamless swap.
5-Fifth Step: Assemble the Mochi Dust your hands and work surface generously with cornstarch or potato starch to prevent sticking. Flatten each dough portion into a circle, place one frozen durian filling ball in the center, and carefully wrap the dough around it, pinching the edges tightly to seal. For variations, like dietary adjustments, press the dough a bit thinner if you want a lighter version without altering the core recipe.
6-Final Step: Finish and Serve Roll each assembled mochi in a bit more starch to keep it from sticking, then freeze the pieces for 15-20 minutes before serving to set the shape and enhance the texture. This quick chill makes them easy to handle and improves the eating experience. Serve straight from the freezer or let them sit at room temperature for 5-10 minutes pair with a refreshing drink for a full treat. For more fruit-based ideas, explore our durian smoothies guide on the site.
Last Step:
Please leave a rating and comment letting us know how you liked this recipe! This helps our business to thrive and continue providing free, high-quality recipes for you.Notes
🍈 Sift the glutinous rice flour beforehand for a lump-free dough, ensuring a silky mochi texture that wraps perfectly around the creamy filling.
🧊 Freeze the durian balls until firm but scoopable—too soft and they’ll ooze during wrapping; this step makes assembly effortless.
❄️ Store extras in an airtight container in the freezer up to 2 months; thaw slightly before eating, and experiment with condensed milk in the filling for extra sweetness.
- Prep Time: 30 minutes
- Chilling Time: 45 minutes
- Cook Time: 5 minutes
- Category: Dessert
- Method: Microwave
- Cuisine: Fusion
- Diet: Vegetarian
Nutrition
- Serving Size: 1 piece
- Calories: 250 kcal
- Sugar: 15 g
- Sodium: 50 mg
- Fat: 10 g
- Saturated Fat: 5 g
- Unsaturated Fat: 4 g
- Trans Fat: 0 g
- Carbohydrates: 35 g
- Fiber: 1 g
- Protein: 4 g
- Cholesterol: 20 mg


