Why You’ll Love This Chinese Chili Sauce
This Chinese chili sauce is a must-try for anyone eager to add a burst of authentic flavor to their meals, drawing from the expertise of a Chinese chef with over 50 years in the kitchen. Shared by someone with a large following for Cantonese cuisine, it brings traditional techniques passed down through generations right to your table. It’s simple yet packed with benefits that make it perfect for home cooks and busy parents alike.
- Ease of preparation: You can whip up this Chinese chili sauce in just about 20 minutes, with only 10 minutes for chopping and another 10 for cooking. This quick process makes it ideal for students and working professionals who want a homemade condiment without spending hours in the kitchen, turning everyday meals into something special with minimal effort.
- Health benefits: This homemade version is low in calories and rich in flavor, offering small amounts of carbohydrates from sugar and sodium from soy sauce and salt, while containing no artificial preservatives. For diet-conscious individuals and seniors, it’s a great choice as it’s gluten-free when you opt for gluten-free soy sauce, providing a nutrient-packed boost without the extras found in store-bought options.
- Versatility: Adapt this Chinese chili sauce to fit various dietary needs, from family dinners to parties, making it a hit with travelers and food enthusiasts. You can use it on everything from stir-fries to noodles, and it’s easy to tweak for different tastes, ensuring it’s suitable for baking enthusiasts or party hosts looking to elevate their gatherings.
- Distinctive flavor: What sets this Chinese chili sauce apart is its perfect balance of heat, tang, and sweetness from fresh ingredients like chili peppers, garlic, and ginger. Developed through generations of Cantonese traditions, it delivers a unique taste that’s not too overpowering, appealing to newlyweds experimenting in the kitchen or anyone seeking an authentic touch in their recipes.
Incorporating this sauce means you’re not just adding spice; you’re bringing in a piece of cultural heritage that enhances meals in a way that’s both fun and flavorful. Whether you’re a busy parent or a food enthusiast, this recipe’s straightforward approach keeps things enjoyable and accessible.
Jump to:
- Why You’ll Love This Chinese Chili Sauce
- How to Prepare the Perfect Chinese Chili Sauce: Step-by-Step Guide
- Ingredients List
- First Step: Prepare Your Ingredients
- Second Step: Heat the Oil
- Third Step: Stir-Fry the Aromatics
- Fourth Step: Add the Remaining Ingredients
- Final Step: Cool and Store
- Dietary Substitutions to Customize Your Chinese Chili Sauce
- Protein and Main Component Alternatives
- Vegetable, Sauce, and Seasoning Modifications
- Mastering Chinese Chili Sauce: Advanced Tips and Variations
- Pro Cooking Techniques
- Flavor Variations
- How to Store Chinese Chili Sauce: Best Practices
- FAQs: Frequently Asked Questions About Chinese Chili Sauce
- What is Chinese chili sauce?
- How do you make Chinese chili sauce at home?
- How long does homemade Chinese chili sauce last?
- What’s the difference between Chinese chili sauce and regular hot sauce?
- How can I use Chinese chili sauce in recipes?
- Chinese Chili Sauce
- Ingredients
- Instructions
- Last Step:
- Notes
- Nutrition
- Did you make this recipe?
How to Prepare the Perfect Chinese Chili Sauce: Step-by-Step Guide
Creating your own Chinese chili sauce at home is easier than you might think, especially with this time-tested recipe from a seasoned Chinese chef. It draws on traditional techniques passed down through generations, emphasizing fresh ingredients for that authentic Cantonese flair. Before diving into the steps, let’s list out the ingredients you’ll need, ensuring everything is measured precisely for the best results.
Ingredients List
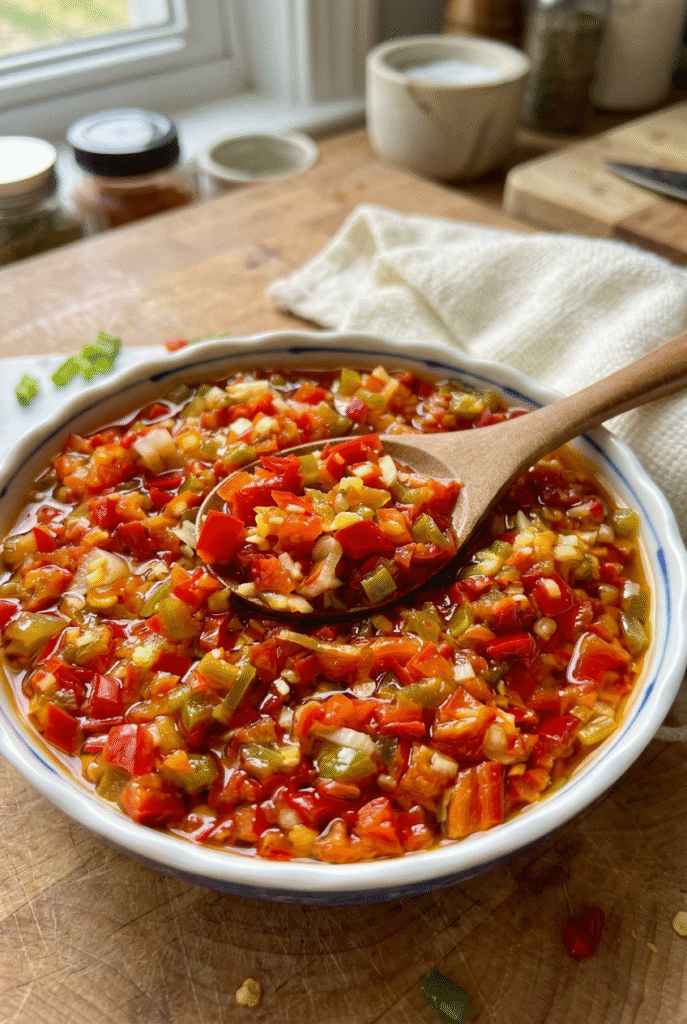
- 200g fresh red chili peppers (finely chopped)
- 100g garlic (finely chopped)
- 50g ginger (finely chopped)
- 120ml neutral oil (1/2 cup)
- 30g salt (2 tbsp)
- 45g sugar (3 tbsp)
- 60ml soy sauce (4 tbsp)
- 45ml rice vinegar (3 tbsp)
With your ingredients ready, follow these clear steps to make a batch of Chinese chili sauce that’s full of flavor and ready in about 20 minutes total. This method focuses on building layers of taste while keeping things simple for home cooks of all levels.
First Step: Prepare Your Ingredients
Start by finely chopping the fresh red chili peppers, garlic, and ginger to ensure they release their flavors evenly during cooking. This initial preparation sets the foundation for the sauce’s bold taste and takes about 10 minutes. Having everything chopped and measured out beforehand makes the process smoother and helps prevent any burning.
Second Step: Heat the Oil
Pour the 120ml of neutral oil into a pan and heat it over medium heat until it’s hot but not smoking, which usually takes about 2 minutes. This step is crucial for stir-frying the aromatics without making them bitter, drawing from traditional Cantonese techniques. Keep an eye on the temperature to maintain that perfect balance.
Third Step: Stir-Fry the Aromatics
Carefully add the chopped garlic, ginger, and chili peppers to the hot oil, stirring constantly for about 5 minutes until they become fragrant. This gentle stir-frying on medium heat brings out the natural oils and flavors, avoiding any burnt tastes as recommended by the chef’s tips. If you’re adapting for dietary needs, this is a good point to ensure your ingredients align with preferences.
Fourth Step: Add the Remaining Ingredients
Once the aromatics are ready, stir in the 60ml of soy sauce, 45ml of rice vinegar, 30g of salt, and 45g of sugar, mixing everything thoroughly. Let the mixture cook for another 5 minutes on medium heat until it starts to thicken slightly, allowing the flavors to meld together beautifully. For variations, you could adjust the soy sauce if you’re using a gluten-free alternative to keep it suitable for diet-conscious individuals.
Final Step: Cool and Store
Remove the pan from the heat and let the sauce cool completely before transferring it to a clean jar for storage, which helps preserve its freshness for several weeks in the fridge. This final touch ensures the sauce is safe to use and ready for your next meal, whether it’s drizzled over noodles or mixed into stir-fries. For more ideas on how to incorporate it, check out our guide to other Asian sauces on the blog.
As noted, the whole process takes around 20 minutes, making it ideal for busy schedules. This Chinese chili sauce not only tastes great but also offers nutritional benefits like being low in calories and free of artificial additives when using the right substitutes.
| Step | Time Required | Key Tip |
|---|---|---|
| Prepare Ingredients | 10 minutes | Use fresh items for best flavor |
| Heat and Stir-Fry | 10 minutes | Keep heat at medium |

Dietary Substitutions to Customize Your Chinese Chili Sauce
Protein and Main Component Alternatives
If you’re looking to tweak this Chinese chili sauce for different dietary needs, start with swaps for the main ingredients. For instance, replace fresh red chili peppers with milder varieties like bell peppers if you’re sensitive to heat, which keeps the sauce versatile for families. Another option is using low-sodium soy sauce to reduce salt intake, making it easier for seniors or those watching their sodium levels.
Vegetable, Sauce, and Seasoning Modifications
Adjust the vegetables by adding or substituting ginger with alternatives like green onions for a fresher twist, especially during seasons when ginger is less available. For sauces, swap rice vinegar with apple cider vinegar to change the tanginess, accommodating preferences for those who are gluten-free or exploring new flavors. Seasonings can be modified by reducing sugar for diet-conscious users, ensuring the sauce remains adaptable without losing its core appeal.
This flexibility makes the recipe a favorite among food enthusiasts and busy parents, allowing for quick changes based on what’s in your kitchen.
This approach to Chinese chili sauce lets you tailor it to your lifestyle, just as the chef has done for years with traditional methods.
Mastering Chinese Chili Sauce: Advanced Tips and Variations
Pro Cooking Techniques
To elevate your Chinese chili sauce, focus on advanced methods like infusing oil slowly for deeper flavors, a technique honed over 50 years by the chef. Use fresh, quality chili peppers to balance heat and taste, and always stir-fry on medium heat to prevent bitterness. These tips help busy professionals create restaurant-quality results at home.
Flavor Variations
Experiment with different seasoning combinations, such as adding more vinegar for extra tang or sugar for sweetness, based on your preferences. For creative twists, incorporate herbs like basil to give it a fusion feel, making it adaptable for party hosts. This keeps the sauce exciting for baking enthusiasts and travelers trying new tastes.
Presentation tips include garnishing with fresh herbs for an eye-catching finish, while make-ahead options involve prepping ingredients in advance for quick assembly. For more sauce ideas, visit our homemade condiments section.
How to Store Chinese Chili Sauce: Best Practices
Proper storage is key to keeping your Chinese chili sauce fresh and flavorful, especially after the quick 20-minute preparation. Start with refrigeration for short-term use, as it maintains the sauce’s quality for several weeks.
- Refrigeration: Keep the sauce in a clean jar in the fridge to preserve its taste and prevent spoilage, following the chef’s advice from years of experience.
- Freezing: For longer storage, freeze in portions, which can last up to six months while retaining crunch and flavor.
- Reheating: Gently warm on low heat to keep the texture intact, ensuring safety and quality for your meals.
- Meal prep considerations: Batch cook and store in advance for busy schedules, making it easy for working professionals to have on hand.
For more on healthy ingredients, check out this resource on chili peppers.

FAQs: Frequently Asked Questions About Chinese Chili Sauce
What is Chinese chili sauce?
How do you make Chinese chili sauce at home?
How long does homemade Chinese chili sauce last?
What’s the difference between Chinese chili sauce and regular hot sauce?
How can I use Chinese chili sauce in recipes?

Chinese Chili Sauce
🌶️ Unlock bold, authentic flavors with this homemade Chinese chili sauce, rich in antioxidants from fresh chilies to spice up your meals and boost metabolism naturally.
👨🍳 Discover chef secrets for a versatile condiment that’s easy to make, adding fiery depth to stir-fries, noodles, and dumplings for an elevated home-cooked Chinese experience.
- Total Time: 20 minutes
- Yield: 1 cup (about 16 tablespoons)
Ingredients
Instructions
1-First Step: Prepare Your Ingredients Start by finely chopping the fresh red chili peppers, garlic, and ginger to ensure they release their flavors evenly during cooking. This initial preparation sets the foundation for the sauce’s bold taste and takes about 10 minutes. Having everything chopped and measured out beforehand makes the process smoother and helps prevent any burning.
2-Second Step: Heat the Oil Pour the 120ml of neutral oil into a pan and heat it over medium heat until it’s hot but not smoking, which usually takes about 2 minutes. This step is crucial for stir-frying the aromatics without making them bitter, drawing from traditional Cantonese techniques. Keep an eye on the temperature to maintain that perfect balance.
3-Third Step: Stir-Fry the Aromatics Carefully add the chopped garlic, ginger, and chili peppers to the hot oil, stirring constantly for about 5 minutes until they become fragrant. This gentle stir-frying on medium heat brings out the natural oils and flavors, avoiding any burnt tastes as recommended by the chef’s tips. If you’re adapting for dietary needs, this is a good point to ensure your ingredients align with preferences.
4-Fourth Step: Add the Remaining Ingredients Once the aromatics are ready, stir in the 60ml of soy sauce, 45ml of rice vinegar, 30g of salt, and 45g of sugar, mixing everything thoroughly. Let the mixture cook for another 5 minutes on medium heat until it starts to thicken slightly, allowing the flavors to meld together beautifully. For variations, you could adjust the soy sauce if you’re using a gluten-free alternative to keep it suitable for diet-conscious individuals.
5-Final Step: Cool and Store Remove the pan from the heat and let the sauce cool completely before transferring it to a clean jar for storage, which helps preserve its freshness for several weeks in the fridge. This final touch ensures the sauce is safe to use and ready for your next meal, whether it’s drizzled over noodles or mixed into stir-fries. For more ideas on how to incorporate it, check out our guide to other Asian sauces on the blog.
Last Step:
Please leave a rating and comment letting us know how you liked this recipe! This helps our business to thrive and continue providing free, high-quality recipes for you.Notes
🌶️ Select fresh, vibrant red chili peppers for the optimal balance of heat, flavor, and natural oils that enhance the sauce’s authenticity.
🔥 Stir-fry the ingredients on medium heat to develop deep flavors without burning the aromatics, which could introduce unwanted bitterness.
🫙 Adjust the rice vinegar and sugar ratios to fine-tune the tanginess and sweetness to your personal taste before cooking.
- Prep Time: 10 minutes
- Cook Time: 10 minutes
- Category: Sauce
- Method: Stovetop
- Cuisine: Chinese
- Diet: Vegan
Nutrition
- Serving Size: 1 tablespoon
- Calories: 50 kcal
- Sugar: 2 g
- Sodium: 450 mg
- Fat: 4 g
- Saturated Fat: 0.5 g
- Unsaturated Fat: 3.5 g
- Trans Fat: 0 g
- Carbohydrates: 3 g
- Fiber: 0.5 g
- Protein: 0.5 g
- Cholesterol: 0 mg


