Why You’ll Love This Collage Cookies
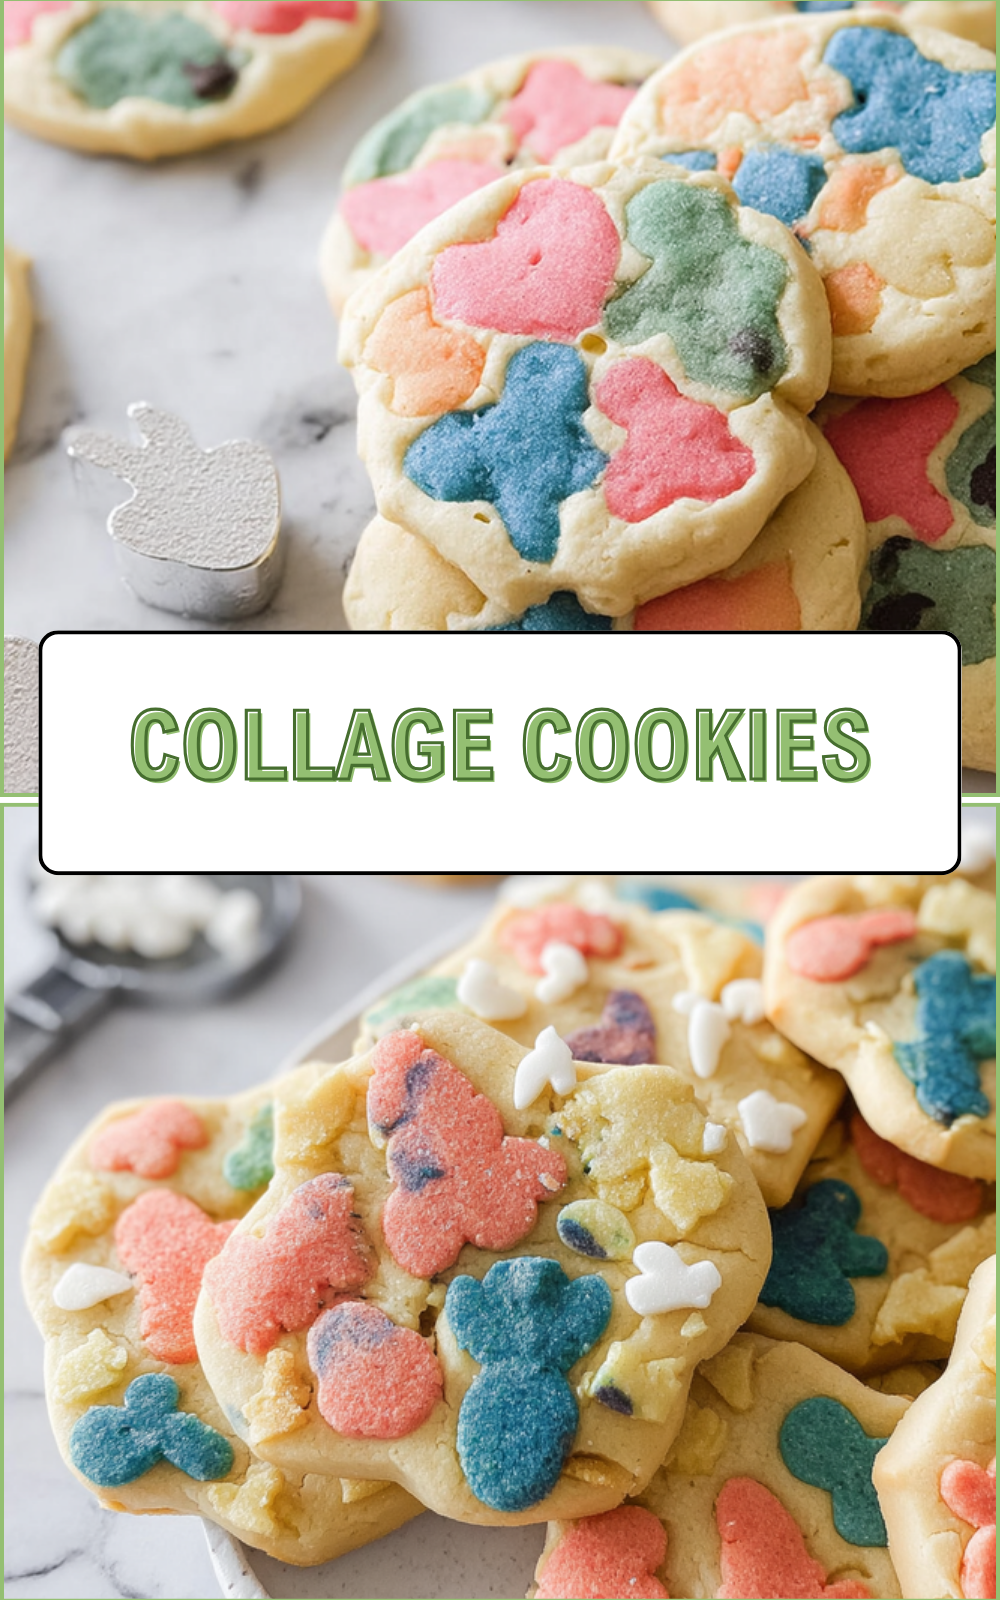
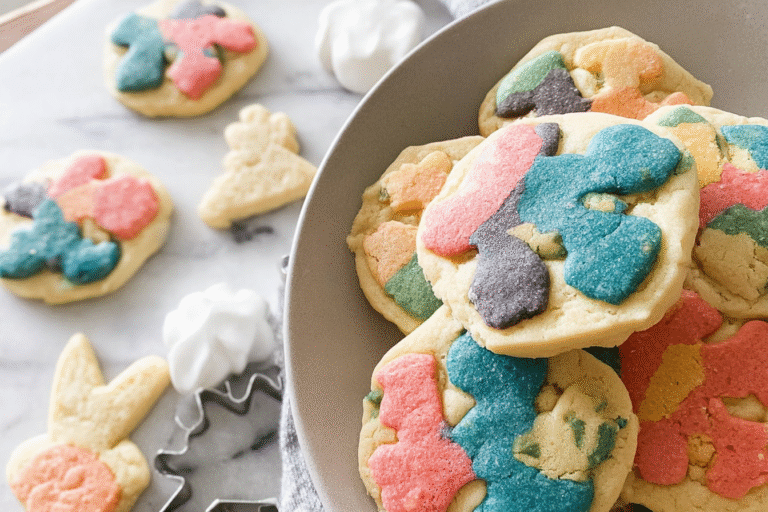
Collage cookies bring a fresh twist to classic sugar cookies. These treats feature stunning designs made with royal icing that look like modern art pieces. Home bakers love them for parties, holidays, or just fun baking days. You get the joy of cookie decorating without needing advanced skills.
- Ease of preparation: This collage sugar cookies recipe comes together quickly. Mix the dough in minutes, chill for an hour, then cut and bake in 10 to 12 minutes per batch. Total active time stays under two hours, leaving plenty for the creative icing part. Perfect for busy parents or working professionals who want impressive results fast.
- Health benefits: Start with real butter and sugar, but you control the portions. Opt for organic ingredients or add a touch of almond flour for extra nutrients. Each cookie offers a small treat with protein from the egg and energy from carbs. Diet-conscious folks appreciate the ability to make smaller sizes or lighter icing for fewer calories.
- Versatility: Adapt to any diet with simple swaps like gluten-free flour or vegan butter. Change designs for themes like weddings, birthdays, or seasonal events. Travelers and students can pack them easily. Party hosts find them crowd-pleasers that impress guests.
- Distinctive flavor: The crisp cutout cookies pair with smooth royal icing for a balance of buttery sweetness and subtle vanilla notes. Bold black lines and color pops create visual wow, but the taste shines through clean and not overly sweet. Baking enthusiasts rave about the professional look and homey flavor.
These beautiful collage cookie designs stand out from plain decorated sugar cookies. Families, seniors, and newlyweds enjoy making them together. Grab your apron and give this how to make collage cookies guide a try.
Jump to:
- Why You’ll Love This Collage Cookies
- Essential Ingredients for Collage Cookies
- Main Ingredients
- Special Dietary Options
- How to Prepare the Perfect Collage Cookies: Step-by-Step Guide
- First Step: Make the Dough
- Second Step: Cut and Bake Cookies
- Third Step: Prepare Royal Icing
- Fourth Step: Flood the Cookies
- Fifth Step: Pipe Collage Designs
- Final Step: Finishing Touches and Serving
- Dietary Substitutions to Customize Your Collage Cookies
- Protein and Main Component Alternatives
- Vegetable, Sauce, and Seasoning Modifications
- Mastering Collage Cookies: Advanced Tips and Variations
- Pro Cooking Techniques
- Flavor Variations
- Presentation Tips
- Make-Ahead Options
- How to Store Collage Cookies: Best Practices
- FAQs: Frequently Asked Questions About Collage Cookies
- What are collage cookies?
- How do you make collage cookies step by step?
- What tools do I need to make collage cookies?
- How long do collage cookies take to make and dry?
- What are common mistakes when making collage cookies and how to fix them?
- Collage Cookies
- Ingredients
- Instructions
- Last Step:
- Notes
- Nutrition
- Did you make this recipe?
Essential Ingredients for Collage Cookies
Gather these items for your royal icing collage cookies. The dough makes soft yet sturdy bases ideal for icing. Royal icing holds sharp lines for those eye-catching patterns.
Main Ingredients
- 2 1/2 cups (315g) all-purpose flour – builds the cookie structure and keeps shapes intact during baking and decorating.
- 1 cup (226g) unsalted butter, softened – adds rich flavor and tender crumb without greasiness.
- 1 cup (200g) granulated sugar – provides sweetness and helps with browning for crisp edges.
- 1 large egg – binds everything and adds moisture for easy rolling.
- 2 teaspoons vanilla extract – infuses classic warm flavor that complements the icing.
- 1/2 teaspoon baking powder – gives a slight lift for the perfect chew.
- 1/2 teaspoon salt – balances sweetness and enhances overall taste.
- 4 cups (500g) powdered sugar – forms the smooth base for royal icing.
- 3 tablespoons meringue powder – stabilizes the icing for firm drying and fine piping.
- 6 tablespoons water – adjusts consistency for flooding and detailing.
- Gel food colors (black, and colors like pink, blue) – creates contrasting lines and pops without thinning icing.
Special Dietary Options
- Vegan: Swap butter for vegan butter or coconut oil; use 1 flax egg (1 tbsp ground flax + 3 tbsp water).
- Gluten-free: Use 1:1 gluten-free flour blend; add 1/4 tsp xanthan gum if not included.
- Low-calorie: Reduce sugar to 3/4 cup, use light butter, and thin icing with less sugar.
| Original | Vegan Swap | Gluten-Free Swap | Low-Cal Swap |
|---|---|---|---|
| Butter | Vegan butter | Same | Light butter |
| Egg | Flax egg | Same | Omit or applesauce |
| Flour | Same | GF blend | Almond flour mix |
Check our basic sugar cookies guide for more dough tips.
How to Prepare the Perfect Collage Cookies: Step-by-Step Guide
This decorated sugar cookies recipe yields 2-3 dozen 3-4 inch cookies. Plan for drying time. Preheat oven to 350°F (175°C).
First Step: Make the Dough
Cream softened butter and sugar in a stand mixer for 2 minutes until light. Add egg and vanilla, mix well. In a bowl, whisk flour, baking powder, and salt. Gradually add dry to wet, mix until dough forms. Do not overmix. Flatten into a disc, wrap in plastic, chill 1 hour.
Second Step: Cut and Bake Cookies
Roll dough to 1/4-inch thick on floured surface. Cut 3-4 inch shapes with round cutters. Place on parchment-lined sheets, 2 inches apart. Bake 10-12 minutes until edges are golden. Cool on sheet 5 minutes, then wire rack completely, about 30 minutes.
Third Step: Prepare Royal Icing
Combine powdered sugar and meringue powder in mixer. Add water, beat on low then high 5-7 minutes to stiff peaks. Divide into bowls: one for flooding (thin with tsp water to honey consistency), one for piping (stiff). Color as needed, cover with damp cloth.
Fourth Step: Flood the Cookies
Fill squeeze bottle with flood icing. Pipe outline around edge, fill center, use toothpick to spread smooth. Tap cookie to pop bubbles. Dry flat 24 hours in low-humidity spot. Use fan if needed.
Fifth Step: Pipe Collage Designs
Fit piping bag with #1 tip, fill with stiff black icing. Hold at 45 degrees, pipe thin lines, dots, loops, swirls randomly. Vary pressure for thick/thin effects. Add tiny dots of color. Practice on parchment first. Dry another 12-24 hours.
Final Step: Finishing Touches and Serving
Test dryness by touch. Stack carefully. Serve on platters for parties. Pair with tea or milk. These royal icing collage cookies wow at events.
Practice makes perfect lines. Start simple for confidence.
Total hands-on: 2-3 hours, plus drying. See royal icing basics for more.

Dietary Substitutions to Customize Your Collage Cookies
Protein and Main Component Alternatives
No heavy protein here, but egg binds dough. Swap for applesauce (1/4 cup) for egg-free. Main flour: almond flour (2 1/2 cups) for nutty, low-carb base, though cookies spread more. Butter alternatives: coconut oil for dairy-free crispness, or applesauce (1/2 cup) to cut fat. Baking powder sub: 1/4 tsp baking soda + 1/2 tsp vinegar.
Vegetable, Sauce, and Seasoning Modifications
Add zucchini (1/2 cup grated, squeezed dry) to dough for moisture without taste change, great for hidden veggies. Icing as sauce: swap water for lemon juice (1 tbsp) for tang. Seasonings: almond extract instead of vanilla, or add cinnamon (1/2 tsp) for spice. Colors from natural sources like beet powder for pink. For low-sugar, monk fruit sweetener (1:1). These tweaks suit seasons, like pumpkin spice fall icing.
Busy parents love quick swaps for picky eaters.
Mastering Collage Cookies: Advanced Tips and Variations
Pro Cooking Techniques
Chill dough overnight for sharper cuts. Use a pasta roller for even 1/8-inch thickness. For icing, glycerin (1 tsp) prevents cracks. Pipe in cool room to avoid bleeding.
Flavor Variations
- Lemon zest in dough for citrus kick.
- Chocolate royal icing with cocoa (1/4 cup).
- Matcha green powder for earthy designs.
Presentation Tips
Arrange in geometric patterns on stands. Dust with edible glitter. Package in cellophane for gifts. For more ideas, see this Facebook group post on collage cookie inspiration.
Make-Ahead Options
Bake dough logs, slice later. Freeze baked cookies pre-flood up to 1 month. Prep icing batches day before.
Small tweaks yield big visual impact.
Food enthusiasts try gold leaf accents. Check collagen protein cookies for a twist.
How to Store Collage Cookies: Best Practices
- Room Temperature: Airtight container, single layers with parchment, up to 2 weeks. Cool, dry spot prevents softening.
- Refrigeration: Not ideal, as humidity softens icing. If needed, 3-5 days in sealed bag.
- Freezing: Freeze baked, flooded cookies 1 month in freezer bags. Thaw at room temp 2 hours before piping. Pipe post-thaw if designs shift.
- Reheating: No need; serve room temp. Microwave 5 seconds max if soft needed, but risks melting icing.
Meal prep: Bake weekends, decorate mid-week. Seniors appreciate easy grab-and-go.
| Method | Duration | Tips |
|---|---|---|
| Counter | 2 weeks | Airtight |
| Freezer | 1 month | Single layer |
FAQs: Frequently Asked Questions About Collage Cookies
What are collage cookies?
How do you make collage cookies step by step?
What tools do I need to make collage cookies?
How long do collage cookies take to make and dry?
What are common mistakes when making collage cookies and how to fix them?
Collage Cookies
🎨🍪 Edible art canvas: buttery sugar cookies topped with intricate collage designs steal the show!
✨ Customizable shapes create stunning, personalized treats perfect for holidays or parties.
- Total Time: 3 hours
- Yield: 24 cookies
Ingredients
– 2 1/2 cups (315g) all-purpose flour for building the cookie structure and keeping shapes intact during baking and decorating
– 1 cup (226g) unsalted butter, softened for adding rich flavor and tender crumb without greasiness
– 1 cup (200g) granulated sugar for providing sweetness and helping with browning for crisp edges
– 1 large egg for binding everything and adding moisture for easy rolling
– 2 teaspoons vanilla extract for infusing classic warm flavor that complements the icing
– 1/2 teaspoon baking powder for giving a slight lift for the perfect chew
– 1/2 teaspoon salt for balancing sweetness and enhancing overall taste
– 4 cups (500g) powdered sugar for forming the smooth base for royal icing
– 3 tablespoons meringue powder for stabilizing the icing for firm drying and fine piping
– 6 tablespoons water for adjusting consistency for flooding and detailing
– Gel food colors (black, and colors like pink, blue) for creating contrasting lines and pops without thinning icing
Instructions
1-First Step: Make the Dough Cream softened butter and sugar in a stand mixer for 2 minutes until light. Add egg and vanilla, mix well. In a bowl, whisk flour, baking powder, and salt. Gradually add dry to wet, mix until dough forms. Do not overmix. Flatten into a disc, wrap in plastic, chill 1 hour.
2-Second Step: Cut and Bake Cookies Roll dough to 1/4-inch thick on floured surface. Cut 3-4 inch shapes with round cutters. Place on parchment-lined sheets, 2 inches apart. Bake 10-12 minutes until edges are golden. Cool on sheet 5 minutes, then wire rack completely, about 30 minutes.
3-Third Step: Prepare Royal Icing Combine powdered sugar and meringue powder in mixer. Add water, beat on low then high 5-7 minutes to stiff peaks. Divide into bowls: one for flooding (thin with tsp water to honey consistency), one for piping (stiff). Color as needed, cover with damp cloth.
4-Fourth Step: Flood the Cookies Fill squeeze bottle with flood icing. Pipe outline around edge, fill center, use toothpick to spread smooth. Tap cookie to pop bubbles. Dry flat 24 hours in low-humidity spot. Use fan if needed.
5-Fifth Step: Pipe Collage Designs Fit piping bag with #1 tip, fill with stiff black icing. Hold at 45 degrees, pipe thin lines, dots, loops, swirls randomly. Vary pressure for thick/thin effects. Add tiny dots of color. Practice on parchment first. Dry another 12-24 hours.
6-Final Step: Finishing Touches and Serving Test dryness by touch. Stack carefully. Serve on platters for parties. Pair with tea or milk. These royal icing collage cookies wow at events.
Last Step:
Please leave a rating and comment letting us know how you liked this recipe! This helps our business to thrive and continue providing free, high-quality recipes for you.Notes
❄️ Chill dough thoroughly – prevents spreading for crisp designs.
🥚 Egg wash helps toppers adhere without sliding.
📏 Use varied thicknesses for 3D collage effect.
- Prep Time: 45 minutes
- Chill Time: 2 hours
- Cook Time: 10 minutes
- Category: Dessert
- Method: Baking
- Cuisine: American
- Diet: Vegetarian
Nutrition
- Serving Size: 1 cookie
- Calories: 220 kcal
- Sugar: 14g
- Sodium: 150mg
- Fat: 11g
- Saturated Fat: 6g
- Unsaturated Fat: 4g
- Trans Fat: 0g
- Carbohydrates: 28g
- Fiber: 1g
- Protein: 3g
- Cholesterol: 55mg