Why You’ll Love This Chicken Rice Casserole
This Chicken Rice Casserole is the kind of cozy dinner that saves the day on busy nights. It is simple, filling, and packed with creamy, cheesy comfort in every bite. With just one pan and a short prep time, it fits right into the routine of home cooks who want a warm meal without a lot of fuss.
- Easy prep and cleanup: Everything comes together in one baking dish, so you spend less time washing dishes and more time enjoying dinner. The prep takes about 10 minutes, which makes this a great choice for weeknights, students, and tired parents.
- Comforting and satisfying: The mix of rice, chicken, cream of chicken soup, milk, and cheddar cheese creates a rich, creamy texture that feels hearty and filling.
- Flexible for different needs: You can swap the rice, cheese, soup, or chicken to fit what you have at home. It also works well for meal prep, family dinners, and potlucks.
- Kid-friendly flavor: The mild seasoning and cheesy finish make it a hit with picky eaters while still tasting great for adults.
This is the kind of dinner that feels like a warm hug after a long day, and it does not ask much from you in return.
If you enjoy easy chicken dinners, you may also like more comforting recipes from Kitchen CC for simple weeknight inspiration.
For readers who want to learn more about chicken as a protein, the National Chicken Council nutrition and health resource offers helpful background. Rice also brings useful energy to the plate, and you can read more at WebMD’s guide to the health benefits of rice.
Jump to:
- Why You’ll Love This Chicken Rice Casserole
- Essential Ingredients for Chicken Rice Casserole
- Special Dietary Options
- Vegan
- Gluten-free
- Low-calorie
- How to Prepare the Perfect Chicken Rice Casserole: Step-by-Step Guide
- First Step: Get the oven and pan ready
- Second Step: Mix the casserole base
- Third Step: Add the mixture to the pan
- Fourth Step: Nestle in the chicken
- Fifth Step: Cover and bake
- Sixth Step: Finish with the remaining cheese
- Final Step: Rest and serve
- Dietary Substitutions to Customize Your Chicken Rice Casserole
- Protein and Main Component Alternatives
- Vegetable, Sauce, and Seasoning Modifications
- Mastering Chicken Rice Casserole: Advanced Tips and Variations
- How to Store Chicken Rice Casserole: Best Practices
- Refrigeration
- Freezing
- Reheating
- Meal prep considerations
- Nutrition Information for Chicken Rice Casserole
- FAQs: Frequently Asked Questions About Chicken Rice Casserole
- Chicken Rice Casserole
- Ingredients
- Instructions
- Last Step:
- Notes
- Nutrition
- Did you make this recipe?
Essential Ingredients for Chicken Rice Casserole
This recipe uses simple pantry and fridge staples, which is part of what makes Chicken Rice Casserole so dependable. Each ingredient has a clear role, from the creamy base to the cheesy finish.
- 1 1/2 cups rice – The base of the casserole that soaks up the creamy sauce and becomes tender as it bakes.
- 2 cans cream of chicken soup – Adds richness, body, and that classic casserole flavor.
- 1 cup water – Helps the rice cook through evenly in the oven.
- 2 cups milk – Gives the dish its creamy, smooth texture.
- 1 batch homemade onion soup mix or 1 envelope onion soup mix – Adds savory flavor and seasoning without needing a long spice list.
- 1 1/2 cups shredded cheddar cheese, divided – Melts into the casserole and adds a cheesy topping at the end.
- 3 thick boneless skinless chicken breasts or thighs – The main protein, adding hearty flavor and making the meal more filling.
Special Dietary Options
Vegan
Use plant-based chicken strips, dairy-free cream soup, and unsweetened oat or soy milk. Swap the cheddar for a vegan shredded cheese.
Gluten-free
Use a gluten-free cream soup and check that the onion soup mix is certified gluten-free. Rice is naturally gluten-free, so the rest is easy to adjust.
Low-calorie
Choose reduced-fat cheese, lower-sodium soup, and skinless chicken breast. You can also increase the vegetable amount to make the dish feel lighter.
How to Prepare the Perfect Chicken Rice Casserole: Step-by-Step Guide
This recipe is easy enough for beginners, but a few small details help it turn out creamy, tender, and full of flavor every time. The oven does most of the work, so once everything is in the pan, you can step back and let it bake.
First Step: Get the oven and pan ready
Preheat your oven to 350 degrees F. Grease a 9×13 inch baking pan so the rice mixture does not stick as it bakes. This step only takes a minute, but it helps with both cleanup and serving later.
Second Step: Mix the casserole base
In a large bowl, combine the 1 1/2 cups rice, 2 cans cream of chicken soup, 2 cups milk, 1 cup water, and the onion soup mix. Stir until everything looks evenly mixed. The mixture will seem thin at first, but that is exactly what you want because the rice needs enough liquid to absorb while baking.
Take a moment to scrape the bottom and sides of the bowl so the seasoning is spread throughout. A well-mixed base gives the finished dish a more even taste in every bite.
Third Step: Add the mixture to the pan
Pour the rice mixture into the prepared 9×13 inch pan and spread it out evenly. Sprinkle half of the shredded cheddar cheese over the top. This first layer of cheese melts into the casserole and adds a little richness before the chicken goes in.
Do not worry if the mixture looks loose before baking. The rice will soak up the liquid in the oven and turn soft and creamy.
Fourth Step: Nestle in the chicken
Place the 3 thick boneless skinless chicken breasts or thighs into the rice mixture, pressing them in gently so they sit partly submerged. If the chicken pieces are especially large, arrange them so they are spaced apart a little for more even cooking. Chicken thighs are a smart option if you want extra moisture and less risk of drying out.
If you like, you can season the chicken lightly with a pinch of black pepper or extra herbs, though the onion soup mix already gives the dish plenty of flavor.
Fifth Step: Cover and bake
Cover the dish tightly with aluminum foil. This traps steam inside the pan, which helps the rice cook properly and keeps the chicken tender. Bake for 1 hour 30 minutes to 2 hours, depending on the thickness of your chicken and the type of rice you use.
Check for doneness near the end of the baking time. The rice should be tender and the chicken should be cooked through. If your rice still feels firm, give it a little more time and keep the foil on so the moisture stays in the pan.
Sixth Step: Finish with the remaining cheese
Remove the casserole from the oven and take off the foil carefully so the steam does not hit your face. Sprinkle the remaining shredded cheddar cheese over the top while the casserole is still hot. The heat from the dish will melt the cheese into a smooth, golden layer.
Final Step: Rest and serve
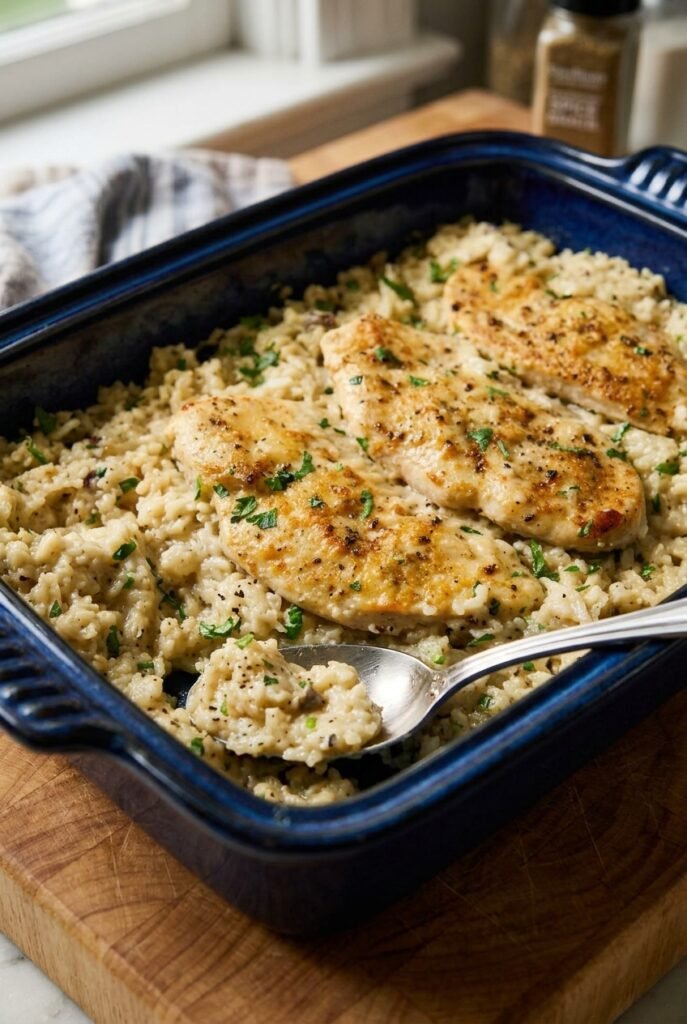
Let the casserole cool for 15 to 20 minutes before serving. This resting time helps the sauce settle and makes it easier to scoop neat portions. Serve warm and enjoy the creamy rice, tender chicken, and cheesy topping together in every bite.
| Recipe Detail | Information |
|---|---|
| Prep Time | 10 minutes |
| Cook Time | 2 hours |
| Total Time | 2 hours 10 minutes |
| Servings | 8 |
| Oven Temperature | 350 degrees F |

Dietary Substitutions to Customize Your Chicken Rice Casserole
Protein and Main Component Alternatives
If you want to switch things up, chicken thighs are a great choice because they stay juicy during the long bake. You can also use leftover cooked chicken, though the baking time may need to be shortened since the meat is already done. For a different protein style, some cooks like to add cooked turkey after the rice is nearly tender.
Brown rice can work too, but it needs more liquid and a longer cooking time. If you use brown rice, plan ahead and keep checking the texture near the end so it does not stay too firm.
Vegetable, Sauce, and Seasoning Modifications
This casserole is easy to change based on what is in your kitchen. Add broccoli, mushrooms, onions, green peppers, or green beans for more color and texture. Fresh thyme or parsley gives it a brighter finish, while different cream soups like mushroom or celery create a new flavor profile.
You can also swap the cheddar for Colby jack, mozzarella, or Swiss. If you are cooking in an Instant Pot, reduce the water to 1/2 cup and the milk to 1 cup, use one can of soup, then cook on high pressure for 8 to 10 minutes with a 10-minute natural release.
Mastering Chicken Rice Casserole: Advanced Tips and Variations
A few simple tricks can take this Chicken Rice Casserole from good to really dependable. Start by using thick chicken breasts or thighs so they hold up during the long bake. If your pieces are very large, a quick even thickness check helps the chicken cook at the same speed.
For the best texture, keep the foil on for the full bake time unless the rice needs a little extra liquid near the end. The steam inside the pan is what makes the rice soft and the chicken tender. If you want a richer top, add a little extra cheese during the last few minutes of baking, then let it melt into a bubbly layer.
Flavor variations are easy too. Try Colby jack for a sharper bite, mozzarella for a milder melt, or Swiss for a nutty taste. You can also stir in herbs like thyme or parsley, or toss in vegetables for a more complete one-pan meal.
For busy weeks, this recipe works well as a make-ahead dinner. Assemble it earlier in the day, cover it, and chill it until baking time.
If you want to prep ahead, store the assembled casserole in the refrigerator for 1 to 2 days before baking. It can also be frozen for up to 3 months. Thaw it overnight in the refrigerator before placing it in the oven.
How to Store Chicken Rice Casserole: Best Practices
Leftovers keep well, which makes this dish a smart choice for meal prep. After cooking, let the casserole cool fully before packing it away. That helps keep the texture from turning soggy.
Refrigeration
Store leftovers in an airtight container in the refrigerator for up to 3 to 4 days. If you plan to reheat only a single portion, use a smaller container so it warms more evenly.
Freezing
For longer storage, freeze the casserole for up to 3 months. Wrap it tightly or store it in a freezer-safe container. If possible, freeze in portion-sized amounts so you can grab just what you need later.
Reheating
Reheat in the oven at 325 degrees F until warmed through, or use the microwave for faster results. Add a splash of milk or water if the rice looks dry. This helps bring back the creamy texture.
Meal prep considerations
If you are cooking for the week, this recipe fits nicely into lunch containers. It holds up well, reheats easily, and keeps a comforting homemade feel even on day two or three.
Nutrition Information for Chicken Rice Casserole
Per serving, this casserole comes in at 418 calories with 46g carbohydrates, 21g protein, and 15g fat. It also provides 7g saturated fat, 63mg cholesterol, 763mg sodium, 368mg potassium, 4g sugar, 485IU vitamin A, 0.5mg vitamin C, 265mg calcium, and 1.5mg iron.
That balance makes it a filling dinner with a good amount of protein and plenty of comfort food appeal. If you are watching sodium or fat, you can make a few small swaps, like using lower-sodium soup or reduced-fat cheese.

FAQs: Frequently Asked Questions About Chicken Rice Casserole
Print
Chicken Rice Casserole
🍗 One-pan wonder delivers tender chicken nestled in creamy cheesy rice – protein-packed comfort food the whole family devours!
🧀 Foolproof 2-hour bake serves 8 effortlessly, make-ahead freezer star for busy weeknights!
- Total Time: 2 hours 30 minutes
- Yield: 8 servings
Ingredients
– 1 1/2 cups rice
– 2 cans cream of chicken soup
– 1 cup water
– 2 cups milk
– 1 batch homemade onion soup mix or 1 envelope onion soup mix
– 1 1/2 cups shredded cheddar cheese, divided
– 3 thick boneless skinless chicken breasts or thighs
Instructions
1-First Step: Get the oven and pan ready
Preheat your oven to 350 degrees F. Grease a 9×13 inch baking pan so the rice mixture does not stick as it bakes. This step only takes a minute, but it helps with both cleanup and serving later.
2-Second Step: Mix the casserole base
In a large bowl, combine the 1 1/2 cups rice, 2 cans cream of chicken soup, 2 cups milk, 1 cup water, and the onion soup mix. Stir until everything looks evenly mixed. The mixture will seem thin at first, but that is exactly what you want because the rice needs enough liquid to absorb while baking.
Take a moment to scrape the bottom and sides of the bowl so the seasoning is spread throughout. A well-mixed base gives the finished dish a more even taste in every bite.
3-Third Step: Add the mixture to the pan
Pour the rice mixture into the prepared 9×13 inch pan and spread it out evenly. Sprinkle half of the shredded cheddar cheese over the top. This first layer of cheese melts into the casserole and adds a little richness before the chicken goes in.
Do not worry if the mixture looks loose before baking. The rice will soak up the liquid in the oven and turn soft and creamy.
4-Fourth Step: Nestle in the chicken
Place the 3 thick boneless skinless chicken breasts or thighs into the rice mixture, pressing them in gently so they sit partly submerged. If the chicken pieces are especially large, arrange them so they are spaced apart a little for more even cooking. Chicken thighs are a smart option if you want extra moisture and less risk of drying out.
If you like, you can season the chicken lightly with a pinch of black pepper or extra herbs, though the onion soup mix already gives the dish plenty of flavor.
5-Fifth Step: Cover and bake
Cover the dish tightly with aluminum foil. This traps steam inside the pan, which helps the rice cook properly and keeps the chicken tender. Bake for 1 hour 30 minutes to 2 hours, depending on the thickness of your chicken and the type of rice you use.
Check for doneness near the end of the baking time. The rice should be tender and the chicken should be cooked through. If your rice still feels firm, give it a little more time and keep the foil on so the moisture stays in the pan.
6-Sixth Step: Finish with the remaining cheese
Remove the casserole from the oven and take off the foil carefully so the steam does not hit your face. Sprinkle the remaining shredded cheddar cheese over the top while the casserole is still hot. The heat from the dish will melt the cheese into a smooth, golden layer.
7-Final Step: Rest and serve
Let the casserole cool for 15 to 20 minutes before serving. This resting time helps the sauce settle and makes it easier to scoop neat portions. Serve warm and enjoy the creamy rice, tender chicken, and cheesy topping together in every bite.
Last Step:
Please leave a rating and comment letting us know how you liked this recipe! This helps our business to thrive and continue providing free, high-quality recipes for you.Notes
🍗 Opt for chicken thighs over breasts to prevent drying out.
🧀 Swap cheddar for Colby Jack, mozzarella, or Swiss for variety.
🥦 Boost nutrition by stirring in broccoli, mushrooms, or green beans.
- Prep Time: 10 minutes
- Cooling: 20 minutes
- Cook Time: 2 hours
- Category: Main Dish
- Method: Oven
- Cuisine: American
Nutrition
- Serving Size: 1 serving
- Calories: 418 kcal
- Sugar: 4g
- Sodium: 763mg
- Fat: 15g
- Saturated Fat: 7g
- Unsaturated Fat: 8g
- Trans Fat: 0g
- Carbohydrates: 46g
- Fiber: 2g
- Protein: 21g
- Cholesterol: 63mg


