Why You’ll Love This Disneyland Grilled Cheese
If you have ever wanted that magical Disneyland Grilled Cheese taste at home, this recipe is a total win. It brings together gooey cheese, buttery bread, and a crave-worthy garlic spread that makes every bite feel like a treat. It is also a fun copycat recipe for busy nights, weekend lunches, or a cozy meal after a long day.
- Easy to make: This Disneyland Grilled Cheese comes together in just 26 minutes, with simple steps and no fancy tools required. The prep is quick, the skillet does the rest, and dinner is on the table fast.
- Rich and filling: With cream cheese, sharp cheddar, medium cheddar, provolone, mayonnaise, and bread, this sandwich brings big comfort food flavor and plenty of protein to keep you satisfied.
- Great for sharing: The recipe makes 8 servings, which makes it handy for family meals, parties, or a casual lunch with friends. You can also pair it with soup, fruit, or a salad.
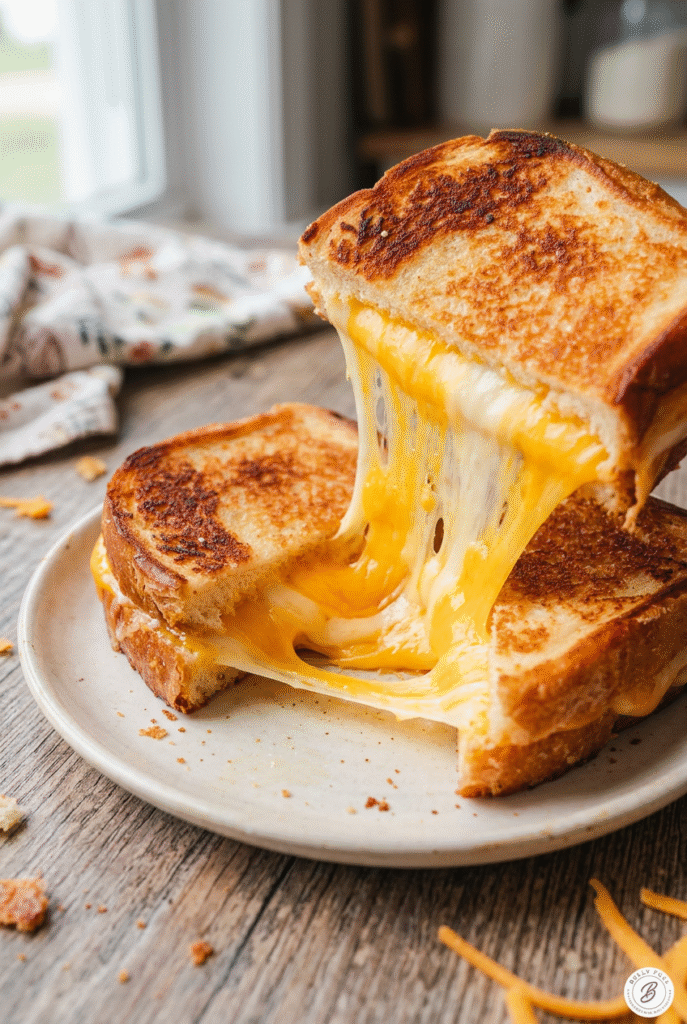
- Classic Disney-inspired flavor: The mix of creamy cheese spread and garlicky outside bread gives this Disneyland Grilled Cheese its signature park-style taste. It feels playful, nostalgic, and just a little bit fancy without being hard to make.
For readers who love checking out comfort food nutrition details, you can also look at trusted food sources like WebMD’s guide to the health benefits of cheese and Verywell Fit’s cheddar cheese nutrition facts for more background on the ingredients used here.
This is the kind of sandwich that makes an ordinary lunch feel a little bit magical.
Jump to:
- Why You’ll Love This Disneyland Grilled Cheese
- Essential Ingredients for Disneyland Grilled Cheese
- Main Ingredients
- Special Dietary Options
- How to Prepare the Perfect Disneyland Grilled Cheese: Step-by-Step Guide
- First Step: Make the cream cheese spread
- Second Step: Mix the garlic spread
- Third Step: Set up the bread and cheese
- Fourth Step: Add the cream cheese mixture
- Fifth Step: Build the sandwiches
- Sixth Step: Coat the outside with garlic spread
- Seventh Step: Cook in a skillet
- Final Step: Serve warm
- Dietary Substitutions to Customize Your Disneyland Grilled Cheese
- Protein and Main Component Alternatives
- Vegetable, Sauce, and Seasoning Modifications
- Mastering Disneyland Grilled Cheese: Advanced Tips and Variations
- Pro cooking techniques
- Flavor variations
- Presentation tips
- Make-ahead options
- How to Store Disneyland Grilled Cheese: Best Practices
- Refrigeration
- Freezing
- Reheating
- Meal prep considerations
- FAQs: Frequently Asked Questions About Disneyland Grilled Cheese
- Where can I get grilled cheese at Disneyland?
- What does the Disneyland grilled cheese taste like?
- How much is grilled cheese at Disneyland?
- Is there a vegan grilled cheese at Disneyland?
- Can kids get grilled cheese at Disneyland and is it good?
- Disneyland Grilled Cheese
- Ingredients
- Instructions
- Last Step:
- Notes
- Nutrition
- Did you make this recipe?
Essential Ingredients for Disneyland Grilled Cheese
This recipe has three parts, and each one matters. The cream cheese spread adds richness, the garlic spread gives the crust its bold flavor, and the sandwich itself brings everything together with melty cheese and crisp bread.
Main Ingredients
- 1/2 cup cream cheese – forms the base of the smooth cream cheese spread.
- 1/2 cup shredded sharp cheddar cheese – adds sharp, tangy flavor to the creamy filling.
- 2 tablespoons heavy cream – helps the cream cheese mixture blend into a smooth spread.
- 1/4 teaspoon coarse salt – balances the richness in the cream cheese spread.
- 1 cup mayonnaise – makes the garlic spread creamy and perfect for browning.
- 1 1/2 teaspoons minced garlic – gives the outside of the sandwich bold savory flavor.
- 1/2 teaspoon coarse salt – seasons the garlic spread.
- 8 slices of bread – the sturdy base for the grilled cheese sandwich.
- 8 slices of medium cheddar cheese – creates the melty cheese layer inside the sandwich.
- 8 slices of provolone cheese – adds smooth, stretchy melt and a mild flavor.
Special Dietary Options
- Vegan: Use plant-based cream cheese, vegan cheddar, vegan provolone, and vegan mayonnaise. Replace the bread if needed with a vegan-friendly loaf.
- Gluten-free: Swap in your favorite gluten-free sandwich bread and check that all packaged cheeses and mayonnaise are certified gluten-free.
- Low-calorie: Use light mayonnaise, reduced-fat cheese, and thinner bread slices if you want a lighter version of this Disneyland Grilled Cheese.
| Part | Ingredients | Purpose |
|---|---|---|
| Cream cheese spread | Cream cheese, sharp cheddar, heavy cream, coarse salt | Creates a rich, smooth filling |
| Garlic spread | Mayonnaise, minced garlic, coarse salt | Adds flavor and helps the bread brown |
| Sandwich build | Bread, medium cheddar, provolone | Forms the gooey grilled cheese center |
How to Prepare the Perfect Disneyland Grilled Cheese: Step-by-Step Guide
Making this Disneyland Grilled Cheese at home is simple, and the order matters. Once you set up the spreads and stack the sandwiches, the skillet does most of the work. The result is a golden, cheesy sandwich with a crispy outside and a soft, melty center.
First Step: Make the cream cheese spread
Add the 1/2 cup cream cheese, 1/2 cup shredded sharp cheddar cheese, 2 tablespoons heavy cream, and 1/4 teaspoon coarse salt to a food processor. Blend until the mixture is smooth and creamy. If you do not have a food processor, you can mash and stir it well in a bowl, but the food processor gives the best texture for spreading.
Second Step: Mix the garlic spread
In a small bowl, stir together 1 cup mayonnaise, 1 1/2 teaspoons minced garlic, and 1/2 teaspoon coarse salt. Mix until the garlic is evenly distributed. This spread is what helps the outside of the bread turn golden and taste extra savory.
Third Step: Set up the bread and cheese
Lay out all 8 slices of bread on a clean work surface. Place 2 slices of medium cheddar cheese on 4 of the bread slices. Place 2 slices of provolone cheese on the other 4 slices. This gives you two cheese layers that will melt together beautifully.
Fourth Step: Add the cream cheese mixture
Spread the cream cheese mixture onto the halves that have the provolone cheese. Use an even layer so every bite has plenty of flavor. If your cheese slices are larger than the bread, tear the slices into pieces to fit, just like the recipe tip suggests.
Fifth Step: Build the sandwiches
Top each provolone and cream cheese side with the cheddar side to form 4 sandwiches. Press them gently together so the filling stays tucked inside while cooking. Keep the bread edges lined up if you can, since that helps the sandwich cook evenly.
Sixth Step: Coat the outside with garlic spread
Spread the garlic mayonnaise mixture onto the outer sides of the bread. This step is key because it gives the sandwich its golden crust and bold flavor. Do not skip it if you want that Disney-style restaurant feel at home.
Seventh Step: Cook in a skillet
Heat a skillet over medium heat. Place each sandwich in the pan and cook for about 2 minutes per side, or until the bread is golden brown and the cheese is mostly melted. If you are using a heavy-duty skillet, keep an eye on sticking and gently lift the sandwich with a spatula. A cast iron or nonstick pan can also work well.
Final Step: Serve warm
When the sandwiches are crisp and melty, move them to a plate and serve right away. The cheese is best when hot, creamy, and stretchy. You can slice each sandwich in half for easier sharing, which is especially helpful for kids, students, and anyone eating on the go.
For the best texture, cook the sandwich low and steady. Medium heat gives you golden bread without burning the outside before the cheese melts.

Dietary Substitutions to Customize Your Disneyland Grilled Cheese
Protein and Main Component Alternatives
This recipe is naturally rich and cheesy, but you can still make smart swaps based on your needs. If you want less dairy, use plant-based cream cheese and vegan cheese slices. If you need more protein, add sliced turkey, crispy bacon, or a plant-based protein option like tofu bacon.
- Swap medium cheddar for dairy-free cheddar if you want a vegan version.
- Use provolone alternatives made from cashews or coconut if dairy is off the table.
- Choose gluten-free bread for anyone avoiding wheat.
- Try reduced-fat cheese if you want a lighter grilled cheese sandwich.
Vegetable, Sauce, and Seasoning Modifications
You can also change up the flavor without losing the spirit of this Disneyland Grilled Cheese. A little tomato slices, caramelized onions, or spinach can add color and freshness. If garlic is too strong, cut the amount back a bit or mix in a pinch of onion powder for a milder taste.
- Add tomato slices for a classic grilled cheese twist.
- Try avocado for creaminess and a softer flavor.
- Use pepper jack for a little heat.
- Stir dried herbs like parsley or basil into the garlic spread for a fresh note.
Mastering Disneyland Grilled Cheese: Advanced Tips and Variations
Once you have made this sandwich once, it is easy to start playing around with it. The base recipe is already delicious, but a few small changes can make it fit your mood, your schedule, or what you have in the fridge.
Pro cooking techniques
Keep the heat at medium so the bread does not burn before the cheese melts. If your skillet tends to stick, use a spatula to lift the sandwich gently instead of forcing it. For even browning, press the sandwich lightly with the spatula while cooking, but do not smash it flat. That keeps the filling thick and gooey.
If you are making several sandwiches, wipe the pan between batches if needed so the garlic spread does not scorch. A cast iron pan gives a great crust, while a nonstick pan makes cleanup easier.
Flavor variations
You can make this Disneyland Grilled Cheese feel new each time by switching up the cheese blend. Try adding Monterey Jack, mozzarella, or American cheese for a different melt. You can also mix a little Dijon mustard into the cream cheese spread for tang, or sprinkle in a tiny bit of smoked paprika for depth.
Presentation tips
Cut each sandwich diagonally for that classic diner look. Serve it with tomato soup, pickle spears, or a handful of chips. If you are serving guests, stack the halves on a wooden board and add a small bowl of dipping sauce on the side. It looks fun and feels special without much extra work.
Make-ahead options
You can mix both spreads ahead of time and keep them in the fridge until you are ready to cook. That saves time on busy school nights or during meal prep. You can also pre-slice the bread and cheese, then assemble the sandwiches just before cooking so they stay fresh.
How to Store Disneyland Grilled Cheese: Best Practices
If you have leftovers, you can store this Disneyland Grilled Cheese and enjoy it later. The texture is best fresh, but careful storage helps keep the sandwich tasty.
Refrigeration
Wrap cooled sandwiches in foil or place them in an airtight container. Store them in the refrigerator for up to 3 days. If possible, keep the sandwiches separate from wet sides like soup so the bread does not get soggy.
Freezing
For longer storage, wrap each sandwich tightly and freeze for up to 1 month. You can also freeze the spreads separately if you want to prep ahead. Thaw overnight in the refrigerator before reheating.
Reheating
Reheat the sandwich in a skillet over low to medium heat so the bread crisps again and the cheese warms through. An oven or toaster oven also works well. The microwave is quick, but it can make the bread soft instead of crisp.
Meal prep considerations
If you plan to make these for lunches or family meals, prepare the spreads in advance and keep the cheese and bread ready to go. Since the total prep time is only 10 minutes, it is easy to cook fresh sandwiches even on a busy day.
| Storage Method | How Long | Best Tip |
|---|---|---|
| Refrigerator | Up to 3 days | Wrap well to prevent sogginess |
| Freezer | Up to 1 month | Thaw before reheating |
| Reheat | As needed | Use skillet for best crispiness |

FAQs: Frequently Asked Questions About Disneyland Grilled Cheese
Where can I get grilled cheese at Disneyland?
What does the Disneyland grilled cheese taste like?
How much is grilled cheese at Disneyland?
Is there a vegan grilled cheese at Disneyland?
Can kids get grilled cheese at Disneyland and is it good?

Disneyland Grilled Cheese
🧀 Recreate Toy Story Land magic with gooey four-cheese layers, creamy spreads, and golden crust – Disney park flavors at home!
🍞 Quick, indulgent grilled cheese perfection for lunch, kids, or themed fun – melts hearts and satisfies cravings!
- Total Time: 26 minutes
- Yield: 4 sandwiches
Ingredients
– 1/2 cup cream cheese
– 1/2 cup shredded sharp cheddar cheese
– 2 tablespoons heavy cream
– 1/4 teaspoon coarse salt
– 1 cup mayonnaise
– 1 1/2 teaspoons minced garlic
– 1/2 teaspoon coarse salt
– 8 slices of bread
– 8 slices of medium cheddar cheese
– 8 slices of provolone cheese
Instructions
1-First Step: Make the cream cheese spread Add the 1/2 cup cream cheese, 1/2 cup shredded sharp cheddar cheese, 2 tablespoons heavy cream, and 1/4 teaspoon coarse salt to a food processor. Blend until the mixture is smooth and creamy. If you do not have a food processor, you can mash and stir it well in a bowl, but the food processor gives the best texture for spreading.
2-Second Step: Mix the garlic spread In a small bowl, stir together 1 cup mayonnaise, 1 1/2 teaspoons minced garlic, and 1/2 teaspoon coarse salt. Mix until the garlic is evenly distributed. This spread is what helps the outside of the bread turn golden and taste extra savory.
3-Third Step: Set up the bread and cheese Lay out all 8 slices of bread on a clean work surface. Place 2 slices of medium cheddar cheese on 4 of the bread slices. Place 2 slices of provolone cheese on the other 4 slices. This gives you two cheese layers that will melt together beautifully.
4-Fourth Step: Add the cream cheese mixture Spread the cream cheese mixture onto the halves that have the provolone cheese. Use an even layer so every bite has plenty of flavor. If your cheese slices are larger than the bread, tear the slices into pieces to fit, just like the recipe tip suggests.
5-Fifth Step: Build the sandwiches Top each provolone and cream cheese side with the cheddar side to form 4 sandwiches. Press them gently together so the filling stays tucked inside while cooking. Keep the bread edges lined up if you can, since that helps the sandwich cook evenly.
6-Sixth Step: Coat the outside with garlic spread Spread the garlic mayonnaise mixture onto the outer sides of the bread. This step is key because it gives the sandwich its golden crust and bold flavor. Do not skip it if you want that Disney-style restaurant feel at home.
7-Seventh Step: Cook in a skillet Heat a skillet over medium heat. Place each sandwich in the pan and cook for about 2 minutes per side, or until the bread is golden brown and the cheese is mostly melted. If you are using a heavy-duty skillet, keep an eye on sticking and gently lift the sandwich with a spatula. A cast iron or nonstick pan can also work well.
8-Final Step: Serve warm When the sandwiches are crisp and melty, move them to a plate and serve right away. The cheese is best when hot, creamy, and stretchy. You can slice each sandwich in half for easier sharing, which is especially helpful for kids, students, and anyone eating on the go.
Last Step:
Please leave a rating and comment letting us know how you liked this recipe! This helps our business to thrive and continue providing free, high-quality recipes for you.Notes
🧀 If cheese slices are too large, tear to fit bread perfectly.
🔥 Use cast iron or nonstick pan to prevent sticking during grilling.
⏱️ Prepare spreads ahead for faster assembly and even better flavor meld.
- Prep Time: 10 minutes
- Cook Time: 16 minutes
- Category: Sandwiches
- Method: Pan-Frying
- Cuisine: American
- Diet: Vegetarian
Nutrition
- Serving Size: 1 sandwich
- Calories: 663 kcal
- Sugar: 3g
- Sodium: 1185mg
- Fat: 54g
- Saturated Fat: 23g
- Unsaturated Fat: 28g
- Trans Fat: 1g
- Carbohydrates: 19g
- Fiber: 1g
- Protein: 25g
- Cholesterol: 106mg


