Why You’ll Love This Sous Vide Chili Oil
This sous vide chili oil recipe is a game-changer for home cooks looking to add bold, aromatic flavors to their meals with minimal effort. It’s especially appealing for busy parents and food enthusiasts who want deep, layered tastes without standing over a stove. By using the sous vide method, you get a rich infusion that enhances everything from stir-fries to snacks, making it a versatile staple in your kitchen.
- H3 Ease of preparation: This recipe stands out because it requires very little active time, with most of the work handled by your sous vide machine. Simply seal the ingredients and let them cook, which frees up your schedule for other tasks. This hands-off approach is ideal for students or working professionals who appreciate simple steps that deliver professional results every time.
- H3 Health benefits: Packed with nutrients from spices like Chinese dried red chiles, this oil offers a boost of vitamins and antioxidants. For instance, it provides high levels of vitamin A and C, which can support immune health and reduce inflammation. Diet-conscious individuals will love how it adds flavor without excessive calories, making it a smart choice for balanced meals.
- H3 Versatility: Whether you’re adapting to vegan diets or gluten-free needs, this oil works in countless ways. It’s perfect for drizzling on noodles, veggies, or even mixed into dressings, appealing to travelers and newlyweds experimenting with global flavors. Seniors might enjoy its gentle heat that doesn’t overwhelm the palate.
- H3 Distinctive flavor: The sous vide process locks in the unique numbing heat from Sichuan peppercorns and the warmth of star anise, creating a depth that traditional methods can’t match. This results in a vibrant, non-bitter oil that elevates everyday dishes, attracting party hosts who want to impress guests with authentic tastes. For more on sous vide benefits, check out this sous vide pros and cons guide.
This method ensures your chili oil is not only flavorful but also safe and consistent, which is why it’s become a favorite among baking enthusiasts and beyond. Whether you’re new to sous vide or a pro, the results speak for themselves in every bottle you make.
Jump to:
- Why You’ll Love This Sous Vide Chili Oil
- Essential Ingredients for Sous Vide Chili Oil
- Main Ingredients:
- Special Dietary Options:
- How to Prepare the Perfect Sous Vide Chili Oil: Step-by-Step Guide
- First Step: Preheat your water bath
- Second Step: Prepare the spices
- Third Step: Assemble the ingredients in the bag
- Fourth Step: Submerge and cook
- Fifth Step: Strain the oil
- Final Step: Store and enjoy
- Dietary Substitutions to Customize Your Sous Vide Chili Oil
- Protein and Main Component Alternatives
- Vegetable, Sauce, and Seasoning Modifications
- Mastering Sous Vide Chili Oil: Advanced Tips and Variations
- Pro Cooking Techniques
- Flavor Variations
- How to Store Sous Vide Chili Oil: Best Practices
- FAQs: Frequently Asked Questions About Sous Vide Chili Oil
- What is sous vide chili oil?
- Why use sous vide to make chili oil?
- What temperature and time for sous vide chili oil?
- What ingredients and oil for sous vide chili oil?
- How do you store sous vide chili oil and how long does it last?
- Sous Vide Chili Oil
- Ingredients
- Instructions
- Last Step:
- Notes
- Nutrition
- Did you make this recipe?
Essential Ingredients for Sous Vide Chili Oil
Gathering the right ingredients is key to making exceptional sous vide chili oil. Each one plays a specific role in building the flavor profile, and I’ve listed them below with exact measurements and explanations to help you understand their purpose. This setup is straightforward and caters to various dietary preferences, ensuring everyone can enjoy a customized version.
Main Ingredients:
- 1 cup neutral-flavored oil (peanut oil preferred) – This serves as the base that absorbs flavors from the spices without overpowering them, making it ideal for a smooth, aromatic finish.
- 1 cup Chinese dried red chiles – These provide the essential heat and color, infusing the oil with bold, spicy notes that define traditional chili oil.
- 1 tablespoon Sichuan peppercorns – Adds a unique numbing sensation and citrusy undertone, enhancing the overall complexity of the oil.
- 10 star anise pods – These contribute a sweet, licorice-like aroma that balances the heat and adds depth to the infusion.
- 2 cinnamon sticks – Bring warmth and a subtle sweetness, helping to round out the spice blend for a more harmonious flavor.
- 2 teaspoons coriander seeds – Offer earthy, citrusy hints that complement the other spices and improve the oil’s overall taste.
- 1 tablespoon fennel seeds – Provide a light, anise-like flavor that enhances the blend and supports digestive health.
- ½ teaspoon cloves (optional) – If included, these add a warm, clove-like spice that intensifies the mix, though they can be omitted for milder versions.
- 3 bay leaves (optional) – These impart a herbal, aromatic note that boosts the oil’s fragrance, making it versatile for different dishes.
Special Dietary Options:
- Vegan: All ingredients in this recipe are naturally plant-based, so no substitutes are needed. Just ensure your oil is from a vegan source if checking labels.
- Gluten-free: The entire list is gluten-free by nature, as it relies on spices and oil without any grains or additives.
- Low-calorie: To cut calories, reduce the oil to ¾ cup while keeping spices the same, but note this might slightly alter the intensity; pair with low-fat meals for diet-conscious use.
Using these ingredients guarantees a batch that’s both potent and adaptable, perfect for home cooks exploring new flavors. For health insights, see this resource on chili pepper benefits.
How to Prepare the Perfect Sous Vide Chili Oil: Step-by-Step Guide
Creating sous vide chili oil is an easy process that yields amazing results with precision cooking. This method ensures even infusion without the rush of high-heat techniques, making it accessible for beginners. We’ll break it down into clear steps, including timing and temperatures, to help you achieve the best flavor. Start by gathering your tools like a sous vide machine, a mortar and pestle or rolling pin, and a fine-mesh sieve.
First Step: Preheat your water bath
Set your sous vide machine to 160 degrees Fahrenheit and fill a large pot or container with water. This temperature is crucial as it gently extracts flavors from the spices without burning them, taking about 10-15 minutes to reach. Once ready, you’ll have a stable environment for infusing the oil effectively.
Second Step: Prepare the spices
Coarsely crush the 1 cup Chinese dried red chiles, 1 tablespoon Sichuan peppercorns, 1 tablespoon fennel seeds, and 2 teaspoons coriander seeds. You can use a mortar and pestle for this, or place them in a Ziplock bag65 and use a rolling pin to break them down. This step releases the essential oils and boosts flavor extraction during cooking, which typically takes 5-10 minutes.
Third Step: Assemble the ingredients in the bag
Add the crushed spices, 10 star anise pods, 2 cinnamon sticks, and 1 cup neutral-flavored oil into a sous vide bag. If using optional additions like ½ teaspoon cloves and 3 bay leaves, include them now. Seal the bag carefully, removing as much air as possible to prevent floating and ensure even cooking, which helps in locking in those aromatic compounds.
Fourth Step: Submerge and cook
Lower the sealed bag into the preheated water bath, using a heat-resistant object like a spoon or clip to keep it submerged, as oil tends to float. Cook for a minimum of 8 hours and up to 16 hours based on your desired intensity this long, low-heat process is what makes the flavors so deep and prevents any burning. For example, 8 hours works for a milder version, while 16 hours creates a more robust oil.
Fifth Step: Strain the oil
After cooking, remove the bag from the water bath and let it cool slightly for safety. Strain the oil through a fine-mesh sieve into a clean container to separate the solids from the liquid. This step ensures a smooth, grit-free oil that’s ready for use, and it only takes a few minutes.
Final Step: Store and enjoy
Once strained, the oil is good to use right away or store in the refrigerator for up to two weeks. Drizzle it over dishes like noodles or stir-fries to add a spicy kick this recipe’s precision makes every batch consistent and flavorful. For more sous vide tips, check out our sous vide basics guide on the blog.
| Nutrient | Amount per 1 cup serving |
|---|---|
| Calories | 2822 kcal |
| Carbohydrates | 181 g |
| Protein | 28 g |
| Total Fat | 240 g |
| Saturated Fat | 19 g |
| Polyunsaturated Fat | 71 g |
| Monounsaturated Fat | 144 g |
| Trans Fat | 1 g |
| Sodium | 222 mg |
| Potassium | 4756 mg |
| Fiber | 76 g |
| Sugar | 97 g |
| Vitamin A | 62754 IU |
| Vitamin C | 77 mg |
| Calcium | 284 mg |
| Iron | 19 mg |

Dietary Substitutions to Customize Your Sous Vide Chili Oil
Protein and Main Component Alternatives
If you’re adapting for dietary needs, swap the Sichuan peppercorns for milder black pepper if you want less heat, which helps for seniors or those with spice sensitivity. For a nut-free version, use grapeseed oil instead of peanut oil to maintain neutrality without allergens. These changes keep the oil versatile while addressing common restrictions.
Vegetable, Sauce, and Seasoning Modifications
Try adding fresh garlic or ginger for a twist, which can enhance the oil for food enthusiasts exploring new tastes. For low-sodium options, reduce the spices slightly or opt for low-salt alternatives, making it easier for busy parents. Seasonal herbs like basil can replace bay leaves to align with what’s fresh, adding a personalized flair.
Mastering Sous Vide Chili Oil: Advanced Tips and Variations
To take your sous vide chili oil to the next level, focus on pro techniques that improve results. For instance, lightly toasting spices before bagging can enhance flavor release. Experiment with variations like adding citrus zest for a zesty kick, perfect for travelers seeking global twists.
Pro Cooking Techniques
- Use a high-quality sous vide circulator to maintain even temperatures and prevent floating bags.
- Monitor the cook time closely, starting at 8 hours and extending to 16 for deeper flavors.
Flavor Variations
- Mix in herbs for herbal notes, or reduce chiles for a milder version suitable for kids.
- Try sweet variations with honey, ideal for party hosts creating unique dips.
How to Store Sous Vide Chili Oil: Best Practices
Proper storage keeps your sous vide chili oil fresh and flavorful. For short-term use, store in the refrigerator in a sealed jar, where it lasts up to two weeks. Freezing in ice cube trays allows for easy portioning and long-term preservation without losing quality.
- Refrigeration: Keep in a cool, dark spot and use within the timeframe to avoid spoilage.
- Freezing: Thaw cubes as needed for quick use in recipes.
- Reheating: Gently warm on low heat to maintain the oil’s aromatic compounds.
- Meal prep: Batch cook and store for busy weeks, making it simple for working professionals.

FAQs: Frequently Asked Questions About Sous Vide Chili Oil
What is sous vide chili oil?
Why use sous vide to make chili oil?
What temperature and time for sous vide chili oil?
What ingredients and oil for sous vide chili oil?
How do you store sous vide chili oil and how long does it last?

Sous Vide Chili Oil
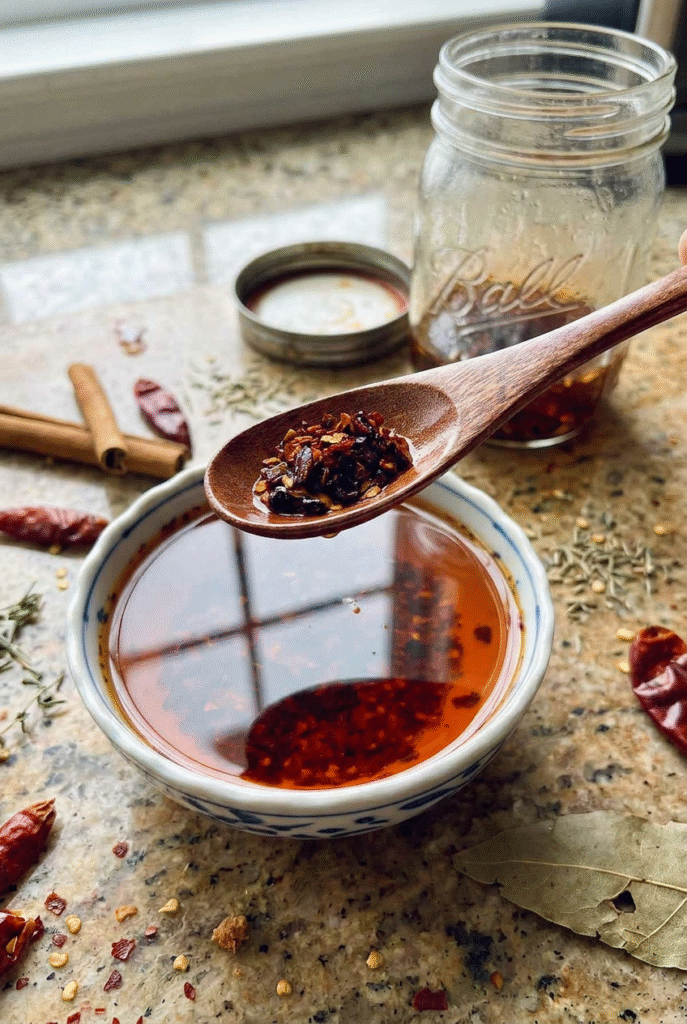
🌶️ Craft a flavorful Sous Vide Chili Oil that gently infuses spices at low temperature for maximum aroma without bitterness, perfect for elevating noodles and dumplings with authentic Sichuan heat and health-boosting antioxidants from chiles.
🛢️ Try this hands-off recipe for a versatile pantry staple that lasts weeks, offering numbing-spicy depth to everyday meals and customizable additions for a superior alternative to store-bought oils.
- Total Time: 8-16 hours 10 minutes
- Yield: 1 cup
Ingredients
– 1 cup neutral-flavored oil (peanut oil preferred) as the base
– 1 cup Chinese dried red chiles for heat and color
– 1 tablespoon Sichuan peppercorns for numbing sensation and citrusy undertone
– 10 star anise pods for sweet, licorice-like aroma
– 2 cinnamon sticks for warmth and subtle sweetness
– 2 teaspoons coriander seeds for earthy, citrusy hints
– 1 tablespoon fennel seeds for light, anise-like flavor
– ½ teaspoon cloves (optional) for warm, clove-like spice
– 3 bay leaves (optional) for herbal, aromatic note
Instructions
1-First Step: Preheat your water bath Set your sous vide machine to 160 degrees Fahrenheit and fill a large pot or container with water. This temperature is crucial as it gently extracts flavors from the spices without burning them, taking about 10-15 minutes to reach. Once ready, you’ll have a stable environment for infusing the oil effectively.
2-Second Step: Prepare the spices Coarsely crush the 1 cup Chinese dried red chiles, 1 tablespoon Sichuan peppercorns, 1 tablespoon fennel seeds, and 2 teaspoons coriander seeds. You can use a mortar and pestle for this, or place them in a Ziplock bag65 and use a rolling pin to break them down. This step releases the essential oils and boosts flavor extraction during cooking, which typically takes 5-10 minutes.
3-Third Step: Assemble the ingredients in the bag Add the crushed spices, 10 star anise pods, 2 cinnamon sticks, and 1 cup neutral-flavored oil into a sous vide bag. If using optional additions like ½ teaspoon cloves and 3 bay leaves, include them now. Seal the bag carefully, removing as much air as possible to prevent floating and ensure even cooking, which helps in locking in those aromatic compounds.
4-Fourth Step: Submerge and cook Lower the sealed bag into the preheated water bath, using a heat-resistant object like a spoon or clip to keep it submerged, as oil tends to float. Cook for a minimum of 8 hours and up to 16 hours based on your desired intensity this long, low-heat process is what makes the flavors so deep and prevents any burning. For example, 8 hours works for a milder version, while 16 hours creates a more robust oil.
5-Fifth Step: Strain the oil After cooking, remove the bag from the water bath and let it cool slightly for safety. Strain the oil through a fine-mesh sieve into a clean container to separate the solids from the liquid. This step ensures a smooth, grit-free oil that’s ready for use, and it only takes a few minutes.
6-Final Step: Store and enjoy Once strained, the oil is good to use right away or store in the refrigerator for up to two weeks. Drizzle it over dishes like noodles or stir-fries to add a spicy kick this recipe’s precision makes every batch consistent and flavorful. For more sous vide tips, check out our sous vide basics guide on the blog.
Last Step:
Please leave a rating and comment letting us know how you liked this recipe! This helps our business to thrive and continue providing free, high-quality recipes for you.Notes
🔥 The sous vide method at low heat preserves delicate aromatic compounds and prevents burning, resulting in a cleaner, more vibrant flavor than traditional stovetop versions.
⏲️ Start with at least 8 hours of cooking for balanced spice extraction, but extend to 16 hours if you prefer a bolder, more complex profile without over-extraction.
🥜 Opt for peanut or grapeseed oil as a neutral base that complements Chinese spices; steer clear of olive oil, which can introduce unwanted fruity notes.
- Prep Time: 10 minutes
- Infusing Time: 8-16 hours
- Cook Time: 8-16 hours
- Category: Condiment
- Method: Sous Vide
- Cuisine: Chinese
- Diet: Vegan, Gluten-Free, Low-Carb
Nutrition
- Serving Size: 1 tablespoon
- Calories: 176 kcal
- Sugar: 6g
- Sodium: 14mg
- Fat: 15g
- Saturated Fat: 1g
- Unsaturated Fat: 13g
- Trans Fat: 0g
- Carbohydrates: 11g
- Fiber: 5g
- Protein: 2g
- Cholesterol: 0mg


