Why You’ll Love This Cheese Kimbap
Cheese kimbap is a delicious twist on a classic Korean favorite that combines gooey cheese with flavorful fillings for a satisfying meal. This quick cheese kimbap recipe stands out for its simplicity, making it ideal for busy days when you need something tasty without much fuss. Let’s break down the key benefits that make this dish a go-to option for home cooks everywhere.
- Ease of preparation: This cheese kimbap recipe comes together in just 30 minutes, perfect for busy parents or working professionals who want a homemade meal without spending hours in the kitchen. You’ll appreciate how straightforward the steps are, using everyday ingredients that you can find at most stores. This ease makes cheese kimbap an accessible choice for beginners like students or newlyweds experimenting with new recipes.
- Health benefits: Packed with nutrients from fermented kimchi, this cheese kimbap offers probiotics that support gut health, as highlighted in resources like the health benefits of fermented foods like kimchi. Each serving provides a balance of protein from cheese and carbs from rice, with only 477 calories per portion, making it suitable for diet-conscious individuals looking for flavorful yet balanced options.
- Versatility: Cheese kimbap adapts easily to various dietary needs, whether you’re vegan, gluten-free, or watching your calories, allowing food enthusiasts to customize it on the fly. It’s great for travelers packing lunches or seniors seeking light meals, and you can swap ingredients based on what’s in your pantry. This flexibility ensures cheese kimbap fits into diverse lifestyles, from quick snacks for party hosts to hearty options for baking enthusiasts.
- Distinctive flavor: The combination of melty mozzarella and tangy kimchi fried rice creates a unique taste that’s both comforting and exciting, setting this kimchi kimbap apart from traditional versions. The sesame oil garnish adds a nutty finish that enhances every bite, making it a hit for family gatherings or casual dinners. If you’re a food enthusiast exploring kimbap recipes, this one delivers a perfect blend of cheesy indulgence and bold Korean flavors that keep you coming back.
With these advantages, cheese kimbap not only satisfies your cravings but also adds variety to your weekly menu. It’s a fun, quick way to enjoy homemade Korean-inspired dishes that feel special yet simple.
Jump to:
- Why You’ll Love This Cheese Kimbap
- Essential Ingredients for Cheese Kimbap
- Main Ingredients
- Special Dietary Options
- How to Prepare the Perfect Cheese Kimbap: Step-by-Step Guide
- Preparation and Mise en Place
- Cooking the Filling
- Assembling and Rolling
- Finishing Touches
- Dietary Substitutions to Customize Your Cheese Kimbap
- Protein and Main Component Alternatives
- Vegetable, Sauce, and Seasoning Modifications
- Mastering Cheese Kimbap: Advanced Tips and Variations
- How to Store Cheese Kimbap: Best Practices
- FAQs: Frequently Asked Questions About Cheese Kimbap
- What is cheese kimbap?
- What ingredients do I need for cheese kimbap?
- Do I need a bamboo rolling mat for cheese kimbap?
- Can I make cheese kimbap in advance?
- How do I store leftover cheese kimbap?
- Cheese Kimbap
- Ingredients
- Instructions
- Last Step:
- Notes
- Nutrition
- Did you make this recipe?
Essential Ingredients for Cheese Kimbap
Gathering the right ingredients is key to making a great cheese kimbap recipe. Below, you’ll find a detailed list of everything needed, organized for easy shopping and preparation. Each item includes its quantity and a quick explanation of its role in the dish.
Main Ingredients
- ½ lb mozzarella cheese block with about 45% moisture, cut into four strips measuring 7 inches by ¾ inch thick – This provides the gooey, melty center that makes cheese kimbap irresistible, offering a creamy texture that contrasts with the crispy seaweed.
- 4 sheets of gim or nori (dry roasted seaweed) – These form the outer wrap, giving the rolls their signature structure and a subtle oceanic flavor that holds everything together.
- 2 teaspoons sesame seeds for garnish – Adds a nutty crunch and visual appeal, enhancing the overall taste and making the dish more aromatic.
- 1 teaspoon sesame oil for garnish – Brings a rich, toasted flavor that seals the rolls and adds moisture for a polished finish.
- 1 tablespoon neutral oil (such as vegetable, avocado, sunflower, grapeseed, peanut, or canola oil) – Used for frying the kimchi fried rice, it ensures even cooking without overpowering the other flavors.
- 4 cups cooked short-grain rice (Calrose or sushi rice preferred) – The base of the filling, providing stickiness for easy rolling and a hearty carbohydrate element.
- 1 cup finely chopped napa cabbage kimchi, well-fermented – Infuses tanginess and probiotics, adding a spicy, fermented kick that’s central to the kimchi kimbap’s unique taste.
- 2 tablespoons kimchi juice from the kimchi package – Boosts the flavor and moisture of the fried rice, enhancing the overall fermented notes.
- 2 cloves garlic minced – Offers a fragrant base that aromatically starts the cooking process for the fried rice.
- 1 tablespoon regular soy sauce (low sodium, light soy sauce, or tamari for gluten-free option) – Seasons the rice with a savory umami depth, and the gluten-free version caters to dietary restrictions.
- 2 teaspoons chicken bouillon powder – Adds a rich, savory boost to the fried rice, helping to balance the flavors without adding extra liquid.
- ½ teaspoon sesame oil to season the fried rice – Provides a subtle nutty note that ties the filling together for a cohesive taste.
Special Dietary Options
- Vegan: Substitute the mozzarella cheese with a plant-based alternative like vegan cheese shreds, and swap the chicken bouillon powder for a vegetable-based version to keep the dish fully plant-based.
- Gluten-free: Use tamari or a certified gluten-free soy sauce, and ensure your kimchi is made without any wheat-based ingredients for safe consumption.
- Low-calorie: Opt for low-fat cheese options and reduce the oil quantities slightly to lower the calorie count while maintaining the dish’s flavorful profile.
This setup ensures your cheese kimbap recipe is straightforward and adaptable, helping even novice home cooks create a delicious meal.
How to Prepare the Perfect Cheese Kimbap: Step-by-Step Guide
Making cheese kimbap at home is simpler than you might think, and this step-by-step guide will walk you through the process for a quick cheese kimbap that’s full of flavor. Start with fresh ingredients and follow along for the best results, with timing details included for ease.
Preparation and Mise en Place
First Step: Gather all your ingredients and prepare them in advance to streamline the process. Chop the kimchi, mince the garlic, and cut the mozzarella into four strips, each 7 inches by ¾ inch thick this takes about 10 minutes of prep time and ensures everything is ready when you need it.
Second Step: Cook the short-grain rice if you haven’t already, using 3 tablespoons extra water for stickier results as suggested in our tips. Once cooked, let it cool slightly but keep it warm for about 5 minutes to achieve the perfect texture for spreading.
Cooking the Filling
Third Step: Heat 1 tablespoon of neutral oil in a pan over medium heat, then add the minced garlic and fry it for 10 seconds until fragrant. This quick step builds the base flavor for your kimchi fried rice, which is the heart of this cheese kimbap recipe.
Fourth Step: Add 1 cup of finely chopped napa cabbage kimchi to the pan and cook for 1 minute until it starts releasing juices, stirring occasionally to evenly distribute the heat. This process infuses the oil with tangy flavors, making the fried rice more vibrant and delicious for your cheese kimbap.
Fifth Step: Mix in 4 cups of cooked short-grain rice, 2 tablespoons of kimchi juice, 1 tablespoon of soy sauce, and 2 teaspoons of chicken bouillon powder. Stir thoroughly for 2-3 minutes over medium heat, then toss with ½ teaspoon of sesame oil and remove from heat. Transfer the mixture to a bowl, cover it, and let it cool for 5 minutes while you set up your rolling station a crucial adaptation for dietary preferences like using tamari for gluten-free options.
Assembling and Rolling
Sixth Step: Lay one sheet of nori rough side up on a clean surface, then spread 1 cup of the warm kimchi fried rice evenly over it, leaving a 1.5-inch border at the top edge. Use wet hands to prevent sticking, and press the rice down gently for an even layer that ensures your cheese kimbap rolls hold together well.
Seventh Step: Place one strip of mozzarella cheese in the middle of the rice layer, right across the center. This positioning allows the cheese to melt perfectly when you optionally heat the rolls later, adding that indulgent element to your cheese kimbap.
Eighth Step: Fold the nori edge closest to you firmly over the cheese and rice, then roll it tightly towards the other end, using the border to seal it with the roll’s heat. Repeat this for the remaining three sheets to make four rolls total, which takes about 5 minutes per roll for a smooth process.
Finishing Touches
Ninth Step: Brush each completed roll lightly with 1 teaspoon of sesame oil, then use a sharp, oiled knife to cut them into ¾-inch wide slices. Rinse the knife with warm water between cuts for clean slices, and if desired, microwave each roll for 15-20 seconds to melt the cheese more, bringing the total cook time to around 10 minutes.
Final Step: Garnish with 2 teaspoons of sesame seeds and serve immediately for the best texture, or let them cool slightly for room temperature enjoyment. This cheese kimbap recipe yields about four servings, perfect for sharing, and you can adapt it by adding more veggies for diet-conscious individuals looking for extra nutrients.

Dietary Substitutions to Customize Your Cheese Kimbap
Protein and Main Component Alternatives
Swapping out proteins in your cheese kimbap can make it fit various needs. For instance, replace the mozzarella with a vegan cheese alternative to keep the gooey texture while making it plant-based, or use tofu strips for a protein-packed option that’s lower in calories.
Other ideas include substituting the kimchi fried rice with quinoa for a gluten-free twist, ensuring the dish remains versatile for busy parents or travelers. These changes help enhance the cheese kimbap recipe without losing its core appeal.
Vegetable, Sauce, and Seasoning Modifications
Adjust vegetables by adding julienned carrots or spinach for more vitamins, or swap soy sauce with coconut aminos for a low-sodium version that suits seniors. Experiment with seasonings like garlic powder if fresh garlic isn’t available, allowing food enthusiasts to personalize their cheese kimbap based on seasons or preferences.
This flexibility in sauces ensures your quick cheese kimbap recipe stays exciting and inclusive for all dietary types.
Mastering Cheese Kimbap: Advanced Tips and Variations
To elevate your cheese kimbap skills, try some pro techniques like using freshly cooked warm rice for better stickiness if you have day-old rice, reheat it covered in the microwave. For flavor variations, experiment with adding pickled radish or different cheeses to create a unique easy cheese kimbap that surprises your taste buds.
- Pro cooking techniques: Spread the fried rice evenly on the seaweed to avoid uneven rolls, and always roll firmly to compact the ingredients, drawing from expert advice in our easy Korean recipes guide for flawless results.
- Flavor variations: Mix in different seasonings or add proteins like eggs for a heartier version, adapting the cheese kimchi kimbap recipe to seasonal ingredients for a fresh twist.
- Presentation tips: Garnish with sesame seeds and slice neatly with an oiled knife, rinsing between cuts for a professional look that impresses at gatherings.
- Make-ahead options: Prepare the filling in advance and store it covered in the fridge for up to a day, making this quick cheese kimbap ideal for meal prep among working professionals.
These tips ensure your how to make cheese kimbap efforts are rewarding and fun.
How to Store Cheese Kimbap: Best Practices
Proper storage keeps your cheese kimbap fresh and tasty. For refrigeration, wrap rolls tightly in plastic and store in the fridge for up to 24 hours to maintain quality. Freezing works well for longer storage place whole rolls in airtight containers for up to a month, thawing overnight before reheating.
- Refrigeration: Keep slices in an airtight container with parchment between layers to prevent sogginess, ideal for short-term needs.
- Freezing: Double-wrap rolls in plastic and foil, then freeze, ensuring they retain their texture for busy schedules.
- Reheating: Warm in the microwave for 1-2 minutes or oven at 350°F for 5 minutes to melt the cheese without making the seaweed soggy.
- Meal prep considerations: Use these methods for batch cooking, helping diet-conscious individuals plan ahead with ease.
This approach keeps your cheese kimbap recipe delicious over time.

FAQs: Frequently Asked Questions About Cheese Kimbap
What is cheese kimbap?
What ingredients do I need for cheese kimbap?
Do I need a bamboo rolling mat for cheese kimbap?
Can I make cheese kimbap in advance?
How do I store leftover cheese kimbap?

Cheese Kimbap
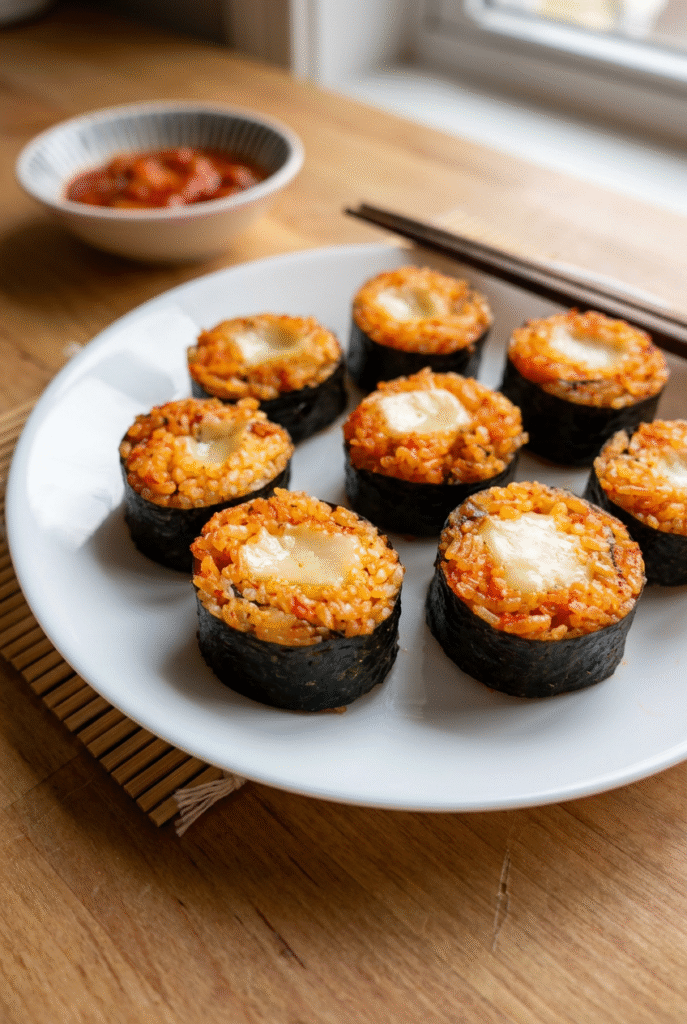
🧀 Indulge in the creamy melt of mozzarella combined with spicy kimchi for a fusion of flavors that satisfies cravings quickly.
🍣 This easy kimbap roll offers a portable, nutritious meal packed with probiotics from kimchi and protein from cheese, ideal for on-the-go lunches.
- Total Time: 30 minutes
- Yield: 4 servings
Ingredients
– ½ lb mozzarella cheese block with about 45% moisture, cut into four strips measuring 7 inches by ¾ inch thick
– 4 sheets of gim or nori (dry roasted seaweed)
– 2 teaspoons sesame seeds for garnish
– 1 teaspoon sesame oil for garnish
– 1 tablespoon neutral oil (such as vegetable, avocado, sunflower, grapeseed, peanut, or canola oil)
– 4 cups cooked short-grain rice (Calrose or sushi rice preferred)
– 1 cup finely chopped napa cabbage kimchi, well-fermented
– 2 tablespoons kimchi juice from the kimchi package
– 2 cloves garlic minced
– 1 tablespoon regular soy sauce (low sodium, light soy sauce, or tamari for gluten-free option)
– 2 teaspoons chicken bouillon powder
– ½ teaspoon sesame oil to season the fried rice
Instructions
1-First Step: Gather all your ingredients and prepare them in advance to streamline the process. Chop the kimchi, mince the garlic, and cut the mozzarella into four strips, each 7 inches by ¾ inch thick this takes about 10 minutes of prep time and ensures everything is ready when you need it.
2-Second Step: Cook the short-grain rice if you haven’t already, using 3 tablespoons extra water for stickier results as suggested in our tips. Once cooked, let it cool slightly but keep it warm for about 5 minutes to achieve the perfect texture for spreading.
3-Third Step: Heat 1 tablespoon of neutral oil in a pan over medium heat, then add the minced garlic and fry it for 10 seconds until fragrant. This quick step builds the base flavor for your kimchi fried rice, which is the heart of this cheese kimbap recipe.
4-Fourth Step: Add 1 cup of finely chopped napa cabbage kimchi to the pan and cook for 1 minute until it starts releasing juices, stirring occasionally to evenly distribute the heat. This process infuses the oil with tangy flavors, making the fried rice more vibrant and delicious for your cheese kimbap.
5-Fifth Step: Mix in 4 cups of cooked short-grain rice, 2 tablespoons of kimchi juice, 1 tablespoon of soy sauce, and 2 teaspoons of chicken bouillon powder. Stir thoroughly for 2-3 minutes over medium heat, then toss with ½ teaspoon of sesame oil and remove from heat. Transfer the mixture to a bowl, cover it, and let it cool for 5 minutes while you set up your rolling station a crucial adaptation for dietary preferences like using tamari for gluten-free options.
6-Sixth Step: Lay one sheet of nori rough side up on a clean surface, then spread 1 cup of the warm kimchi fried rice evenly over it, leaving a 1.5-inch border at the top edge. Use wet hands to prevent sticking, and press the rice down gently for an even layer that ensures your cheese kimbap rolls hold together well.
7-Seventh Step: Place one strip of mozzarella cheese in the middle of the rice layer, right across the center. This positioning allows the cheese to melt perfectly when you optionally heat the rolls later, adding that indulgent element to your cheese kimbap.
8-Eighth Step: Fold the nori edge closest to you firmly over the cheese and rice, then roll it tightly towards the other end, using the border to seal it with the roll’s heat. Repeat this for the remaining three sheets to make four rolls total, which takes about 5 minutes per roll for a smooth process.
9-Ninth Step: Brush each completed roll lightly with 1 teaspoon of sesame oil, then use a sharp, oiled knife to cut them into ¾-inch wide slices. Rinse the knife with warm water between cuts for clean slices, and if desired, microwave each roll for 15-20 seconds to melt the cheese more, bringing the total cook time to around 10 minutes.
10-Final Step: Garnish with 2 teaspoons of sesame seeds and serve immediately for the best texture, or let them cool slightly for room temperature enjoyment. This cheese kimbap recipe yields about four servings, perfect for sharing, and you can adapt it by adding more veggies for diet-conscious individuals looking for extra nutrients.
Last Step:
Please leave a rating and comment letting us know how you liked this recipe! This helps our business to thrive and continue providing free, high-quality recipes for you.Notes
🍚 Use freshly cooked warm rice for the best stickiness when rolling the kimbap.
🧀 Choose mozzarella with 45% moisture for optimal melting texture.
🔪 Oil and rinse your knife between cuts to ensure neat, clean slices.
- Prep Time: 20 minutes
- Cook Time: 10 minutes
- Category: Main Dish
- Method: Stir-Fry
- Cuisine: Korean
- Diet: Omnivore
Nutrition
- Serving Size: 1 roll
- Calories: 477 kcal
- Sugar: 1 g
- Sodium: 730 mg
- Fat: 19 g
- Saturated Fat: 8 g
- Unsaturated Fat: 9 g
- Trans Fat: 0 g
- Carbohydrates: 57 g
- Fiber: 1 g
- Protein: 18 g
- Cholesterol: 45 mg


