Why You’ll Love This Salt And Pepper Squid
If you’re craving a dish that’s simple yet full of excitement, the salt and pepper squid recipe is a great choice for home cooks looking to whip up something tasty without a fuss. This Asian favorite delivers an irresistible crunch with every bite, making it perfect for family dinners or quick weeknight meals. Let’s break down why this recipe stands out and why it might become a regular in your kitchen.
- Ease of preparation: This salt and pepper squid comes together in just 40 minutes, including prep and cooking time, which makes it ideal for busy parents and working professionals. The steps are straightforward, requiring basic kitchen tools like a pot for frying and a wok for stir-frying, so even students or beginners can nail it on the first try. Plus, with ingredients that are easy to find at most local stores, you’ll spend less time shopping and more time enjoying the meal.
- Health benefits: Loaded with protein from the squid, this recipe offers a nutritious boost with around 22 grams per serving, supporting muscle health for active folks like travelers or fitness enthusiasts. It’s also rich in vitamins like C from the green peppers and minerals such as iron, helping with energy levels and overall wellness. For diet-conscious individuals, this dish keeps things balanced with just 398 calories per serving and low sugar, making it a smart pick without skimping on flavor.
- Versatility: Salt and pepper squid adapts easily to various dietary needs, whether you’re hosting a party or cooking for seniors who prefer milder tastes. You can swap ingredients for gluten-free options or lighten it up for low-calorie meals, fitting into routines for baking enthusiasts or those watching their intake. It’s also flexible for different occasions, from a quick appetizer for entertainment lovers to a main dish paired with rice for newlyweds exploring new recipes.
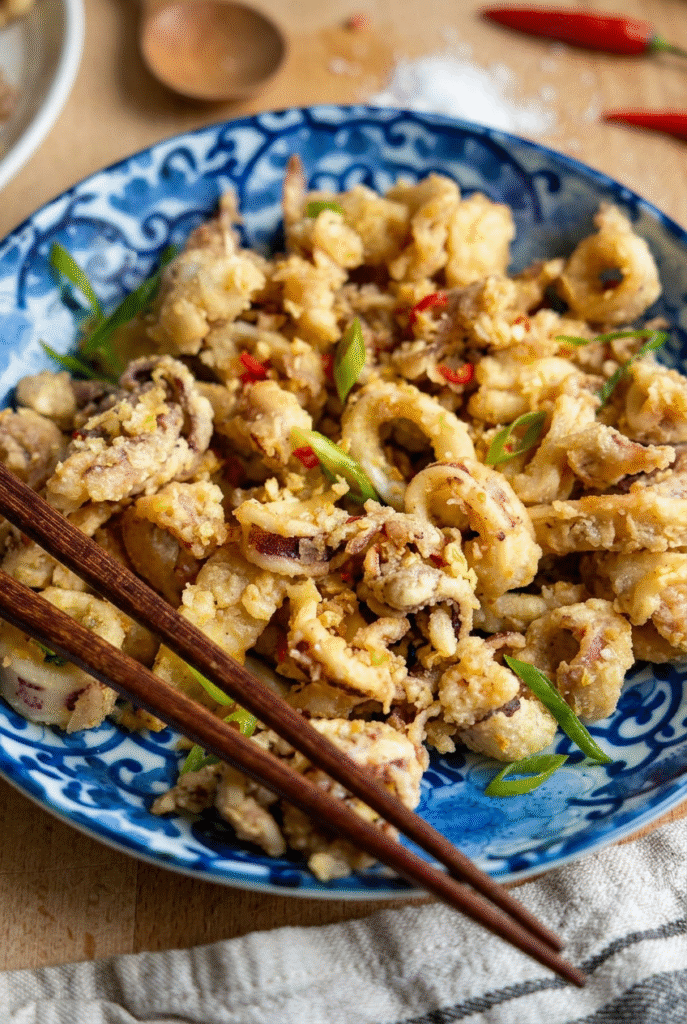
- Distinctive flavor: What sets this salt and pepper squid apart is the bold mix of fresh white pepper, garlic, and ginger that creates a zesty kick without overwhelming the natural sweetness of the squid. The crispy coating from a blend of flours adds an extra layer of texture that’s fun to eat, appealing to food enthusiasts who love that authentic Asian twist. This recipe’s simplicity highlights the fresh ingredients, making each bite a delightful experience that keeps everyone coming back for more.
This recipe’s charm lies in how it combines ease with excitement, perfect for anyone wanting to enjoy salt and pepper squid at home. By focusing on these benefits, you’ll see why it’s not just a meal but a go-to option for everyday enjoyment.
Jump to:
- Why You’ll Love This Salt And Pepper Squid
- Essential Ingredients for Salt And Pepper Squid
- Main Ingredients
- Special Dietary Options
- How to Prepare the Perfect Salt And Pepper Squid: Step-by-Step Guide
- First Step: Prepare the Squid
- Second Step: Heat the Oil for Frying
- Third Step: Coat and Fry the Squid
- Fourth Step: Stir-Fry the Aromatics
- Fifth Step: Combine and Serve
- Dietary Substitutions to Customize Your Salt And Pepper Squid
- Protein and Main Component Alternatives
- Vegetable, Sauce, and Seasoning Modifications
- Mastering Salt And Pepper Squid: Advanced Tips and Variations
- How to Store Salt And Pepper Squid: Best Practices
- FAQs: Frequently Asked Questions About Salt And Pepper Squid
- What is salt and pepper squid?
- How do you prepare squid for salt and pepper squid?
- What coating do you use for crispy salt and pepper squid?
- What temperature and time to fry salt and pepper squid?
- What do you serve salt and pepper squid with?
- Salt And Pepper Squid
- Ingredients
- Instructions
- Last Step:
- Notes
- Nutrition
- Did you make this recipe?
Essential Ingredients for Salt And Pepper Squid
To make the perfect salt and pepper squid, you’ll need a handful of key ingredients that blend together for that signature crunch and flavor. Below is a detailed list of everything required, with precise measurements and a quick explanation of why each one matters. This setup ensures your dish turns out just right every time.
Main Ingredients
- 1 1/2 pounds squid (680g) – This forms the base of the dish, providing tender, protein-rich seafood that’s quick to cook and absorbs flavors well for a satisfying texture.
- 1 tablespoon shaoxing wine – Adds a subtle depth and tang to marinate the squid, enhancing its natural taste without overpowering it.
- 1/2 teaspoon sesame oil – Infuses a nutty aroma during marination, helping to tenderize the squid and lock in moisture for better results.
- 5 cups vegetable oil (for frying; plus 1 tablespoon for stir-frying) – Essential for achieving that golden crispiness; the frying oil should be neutral and heated to the right temperature, while the extra tablespoon is for quickly stir-frying aromatics.
- 1/2 cup all-purpose flour – Part of the coating mix that helps create a light, crunchy exterior when fried, binding well with the squid.
- 1/2 cup semolina flour – Contributes to the extra crunch in the coating, giving the salt and pepper squid its distinctive texture that’s fun to bite into.
- 1/3 cup plain cornmeal – Adds a slight corn flavor and helps with crispiness in the batter, making the fried squid more enjoyable and hearty.
- 1 teaspoon salt (plus more to taste) – Seasons the coating and final dish, balancing flavors and enhancing the natural brininess of the squid.
- 1/2 teaspoon white pepper (plus more to taste) – Provides a sharp, peppery kick that’s central to the salt and pepper squid’s appeal, with fresh cracking for maximum flavor.
- 2 hot green peppers (cut lengthwise and sliced thinly) – Bring heat and freshness to the stir-fry, adding a spicy element that complements the squid’s richness.
- 5 cloves garlic (sliced) – Offers a pungent, aromatic boost when stir-fried, elevating the overall taste of the salt and pepper squid.
- 2 teaspoons ginger (minced) – Adds a warm, zesty note that pairs perfectly with garlic and peppers, ensuring the dish has that authentic Asian flair.
Special Dietary Options
- Vegan: Substitute the squid with firm tofu or king oyster mushrooms for a plant-based version, keeping the same coating and seasonings to maintain the crispy texture.
- Gluten-free: Use gluten-free all-purpose flour in place of regular flour, and ensure your shaoxing wine is gluten-free to keep the recipe accessible for those with sensitivities.
- Low-calorie: Reduce oil quantities slightly and opt for air-frying instead of deep-frying to cut down on fats, while focusing on the veggies to boost the nutritional profile without adding extra calories.
Using these ingredients as listed ensures your salt and pepper squid is flavorful and adaptable, helping you tailor it to your needs while keeping the recipe straightforward.
How to Prepare the Perfect Salt And Pepper Squid: Step-by-Step Guide
Getting salt and pepper squid just right involves a few key steps that make the process fun and straightforward. Start with fresh ingredients and follow along for a crispy result that everyone will love. This guide breaks it down into easy actions, with timing and tips to help you along the way.
First Step: Prepare the Squid
Rinse the 1 1/2 pounds of squid thoroughly under cold water to clean it well and remove any sliminess. Trim the tentacles, leaving about 1/4 inch attached to the hood for even cooking, and halve larger pieces lengthwise into bite-sized portions. Once done, drain the squid in a colander and marinate it in 1 tablespoon shaoxing wine and 1/2 teaspoon sesame oil for a few minutes; this step adds flavor and tenderness, taking about 5 minutes total.
Second Step: Heat the Oil for Frying
Heat 5 cups of vegetable oil in a deep pot until it reaches 325°F, which is ideal for frying without making the squid tough aim for about 4 inches of oil depth. While the oil heats, combine 1/2 cup all-purpose flour, 1/2 cup semolina flour, 1/3 cup plain cornmeal, 1 teaspoon salt, and 1/2 teaspoon white pepper in a bowl for the coating mix. This preparation should take around 5 minutes, ensuring everything is ready for dredging.
Third Step: Coat and Fry the Squid
Dredge the marinated squid in the flour mixture in small batches, shaking off any excess to avoid a heavy coating. Fry the squid for 2 to 2 1/2 minutes until it’s golden brown, stirring gently to ensure even cooking; remove and drain on paper towels. Adjust the salt to taste while it’s still hot, and sprinkle with additional cracked white pepper for extra flavor this frying process takes about 10 minutes total, depending on batch size.
Fourth Step: Stir-Fry the Aromatics
In a wok over medium-high heat, add 1 tablespoon of vegetable oil and stir-fry 2 teaspoons of minced ginger for about 20 seconds until fragrant. Add 5 sliced garlic cloves and stir until they’re lightly golden, then toss in 2 sliced hot green peppers and stir-fry for another 30 seconds to build layers of flavor without burning.
Fifth Step: Combine and Serve
Toss the fried squid into the wok with the aromatics and stir-fry for 1 minute to coat everything evenly. For the best results, serve the salt and pepper squid hot with white rice to complete the meal, which enhances the flavors and makes it more filling. This final step takes just a minute or two, and you’ll have a dish ready in under 40 minutes total prep and cook time.
Adapting for dietary preferences is simple; for instance, if you’re going gluten-free, swap the flours as needed. This salt and pepper squid recipe is versatile, ensuring it’s a hit for food enthusiasts of all levels.

Dietary Substitutions to Customize Your Salt And Pepper Squid
Protein and Main Component Alternatives
If squid isn’t on hand or you want to switch things up, try using shrimp or firm tofu as a substitute for the 1 1/2 pounds of squid to keep the dish protein-packed. These options maintain the crispy texture when coated and fried, making it easy for those with seafood allergies or vegetarians. Always adjust cooking times slightly, as shrimp might need just 1-2 minutes less in the oil.
Vegetable, Sauce, and Seasoning Modifications
For a fresher take, swap the hot green peppers with bell peppers or add extra vegetables like bok choy for more crunch and nutrition. If you prefer milder flavors, reduce the white pepper or use black pepper instead, and consider a light soy sauce drizzle for added depth without overpowering the dish. These changes make the salt and pepper squid adaptable to seasons or restrictions, perfect for diet-conscious eaters.
Mastering Salt And Pepper Squid: Advanced Tips and Variations
Taking your salt and pepper squid to the next level involves some expert tricks and creative twists. Here are ways to refine your technique and experiment with flavors for even better results.
- Pro cooking techniques: Cut squid into uniform sizes for consistent frying, as this ensures even crispiness without any pieces overcooking. Always season the hot squid right after frying for the best flavor adhesion, and stir-fry aromatics quickly to avoid burning, drawing from tips like cracking white pepper fresh for that bold taste.
- Flavor variations: Mix in different seasonings, such as adding chili flakes for extra heat or using lemon zest for a tangy twist, to personalize the dish. For a variation, try replacing some flour with almond flour for a nuttier crunch, keeping the core blend that creates extra texture.
- Presentation tips: Plate the squid with colorful garnishes like fresh herbs or sliced lime to make it visually appealing for parties. Eat the crispy garlic and peppers for full flavor, as they add to the overall experience these internal links list i json format i give you.
- Make-ahead options: Prep the squid marinade and coating mix in advance to save time on busy days, storing them in the fridge for up to 2 hours before frying.
These internal links can provide more ideas; for example, check out our garlic chili shrimp recipe for similar quick meals. With a little practice, you’ll master salt and pepper squid variations effortlessly.
How to Store Salt And Pepper Squid: Best Practices
Keeping your salt and pepper squid fresh is key to enjoying leftovers without losing that crave-worthy crunch. Follow these guidelines to maintain quality and safety.
- Refrigeration: Store cooked squid in an airtight container in the fridge for up to 1 day to keep it from getting soggy.
- Freezing: For longer storage, freeze portions in freezer-safe bags for up to a month, thawing in the fridge before reheating.
- Reheating: Warm it in a 400°F oven for 5 minutes to restore crispiness, avoiding the microwave which can make it soft.
- Meal prep considerations: Batch cook and store in individual portions for easy meals, ensuring you reheat quickly to preserve flavors.

FAQs: Frequently Asked Questions About Salt And Pepper Squid
What is salt and pepper squid?
How do you prepare squid for salt and pepper squid?
What coating do you use for crispy salt and pepper squid?
What temperature and time to fry salt and pepper squid?
What do you serve salt and pepper squid with?

Salt And Pepper Squid
🦑 Delight in this crispy salt and pepper squid, loaded with protein and omega-3s for a seafood boost that’s light yet satisfying as an appetizer or main.
🌶️ This fried Asian favorite delivers bold, peppery crunch with minimal prep, perfect for impressing guests with restaurant-style flavors at home.
- Total Time: 40 minutes
- Yield: 4 servings
Ingredients
– 1 1/2 pounds squid (680g)
– 1 tablespoon shaoxing wine
– 1/2 teaspoon sesame oil
– 5 cups vegetable oil for frying
– 1 tablespoon vegetable oil for stir-frying
– 1/2 cup all-purpose flour
– 1/2 cup semolina flour
– 1/3 cup plain cornmeal
– 1 teaspoon salt (plus more to taste)
– 1/2 teaspoon white pepper (plus more to taste)
– 2 hot green peppers, cut lengthwise and sliced thinly
– 5 cloves garlic, sliced
– 2 teaspoons ginger, minced
Instructions
1-First Step: Prepare the Squid Rinse the 1 1/2 pounds of squid thoroughly under cold water to clean it well and remove any sliminess. Trim the tentacles, leaving about 1/4 inch attached to the hood for even cooking, and halve larger pieces lengthwise into bite-sized portions. Once done, drain the squid in a colander and marinate it in 1 tablespoon shaoxing wine and 1/2 teaspoon sesame oil for a few minutes; this step adds flavor and tenderness, taking about 5 minutes total.
2-Second Step: Heat the Oil for Frying Heat 5 cups of vegetable oil in a deep pot until it reaches 325°F, which is ideal for frying without making the squid tough aim for about 4 inches of oil depth. While the oil heats, combine 1/2 cup all-purpose flour, 1/2 cup semolina flour, 1/3 cup plain cornmeal, 1 teaspoon salt, and 1/2 teaspoon white pepper in a bowl for the coating mix. This preparation should take around 5 minutes, ensuring everything is ready for dredging.
3-Third Step: Coat and Fry the Squid Dredge the marinated squid in the flour mixture in small batches, shaking off any excess to avoid a heavy coating. Fry the squid for 2 to 2 1/2 minutes until it’s golden brown, stirring gently to ensure even cooking; remove and drain on paper towels. Adjust the salt to taste while it’s still hot, and sprinkle with additional cracked white pepper for extra flavor this frying process takes about 10 minutes total, depending on batch size.
4-Fourth Step: Stir-Fry the Aromatics In a wok over medium-high heat, add 1 tablespoon of vegetable oil and stir-fry 2 teaspoons of minced ginger for about 20 seconds until fragrant. Add 5 sliced garlic cloves and stir until they’re lightly golden, then toss in 2 sliced hot green peppers and stir-fry for another 30 seconds to build layers of flavor without burning.
5-Fifth Step: Combine and Serve Toss the fried squid into the wok with the aromatics and stir-fry for 1 minute to coat everything evenly. For the best results, serve the salt and pepper squid hot with white rice to complete the meal, which enhances the flavors and makes it more filling. This final step takes just a minute or two, and you’ll have a dish ready in under 40 minutes total prep and cook time.
Last Step:
Please leave a rating and comment letting us know how you liked this recipe! This helps our business to thrive and continue providing free, high-quality recipes for you.Notes
✂️ Cut squid into uniform pieces for even cooking and consistent crunch in every bite.
🔥 Season the fried squid right after draining while it’s still hot to ensure spices stick well.
⚡ Stir-fry the aromatics quickly over high heat to preserve their crisp texture without burning.
- Prep Time: 20 minutes
- Cook Time: 20 minutes
- Category: Appetizer
- Method: Frying
- Cuisine: Chinese
- Diet: Omnivore
Nutrition
- Serving Size: about 6 oz
- Calories: 398 kcal
- Sugar: 1 g
- Sodium: 489 mg
- Fat: 21 g
- Saturated Fat: 15 g
- Unsaturated Fat: 6 g
- Trans Fat: 0 g
- Carbohydrates: 30 g
- Fiber: 2 g
- Protein: 22 g
- Cholesterol: 264 mg


